
Reaper Daw How To Use | Beginner Guide
Создавайте группу онлайн, продвигайте свою музыку, покупайте собственные биты, звуковые партии и делитесь с нами своим битом или треком в качестве лупа без лицензионных отчислений. Сотрудничайте, чтобы создавать биты онлайн с лучшими производителями лупов со всего мира на Форуме для музыкантов и создателей битов. Будьте в курсе музыкальных новостей и изучайте видеоуроки FL Studio и статьи в блоге . Бесплатные загрузки музыкального программного обеспечения DAW, пакеты VST и инструментов для FL Studio, Pro Tools, Logic, Ableton, а также способы использования самого популярного бесплатного программного обеспечения DAW, плагинов Fruity Loop, MIDI и многого другого.
Reaper is easy to learn from Cockos Incorporated
What is a DAW?
A DAW is a software that allows you to record, edit and mix multiple tracks of audio on your computer just as is done with your favourite songs on Spotify (or wherever) using large consoles in expensive studios. With Reaper you can record all of your instruments (including plug in effects) at once with a live backing band, or, if you are working alone, one at a time, playing back previous recordings while recording new tracks alongside them.
For the purposes of this discussion, I will assume the latter – that you are working alone so as to reduce the potential use cases to cover down to a manageable number. I will also assume you use Windows though there is still plenty to learn from this article if you are on a Mac or Linux machine. Shortcut keys often work similarly on a Mac if you replace the PC control with the Apple command key. Ok, let’s get started.
What can a DAW do?
As with other DAWs, Reaper has a lot of flexibility built-in to suit your creative recording needs and it’s capable of recording just as high of quality recordings as any other digital audio workstation daw, as well as midi recording editing. It’s fully-functional and multi-purpose. You can edit your recordings to fix mistakes or change arrangements after recording is finished or simply re-record a section altogether.
You can use a metronome to stay in time, speed up or slow down the tempo without affecting existing recordings to work your way up to speed with a challenging phrase, you can change pitch to fix a vocal error on an otherwise good take, de-ess, EQ out the rumble of the ever-present AC, compress a mix to bind it together.
Add reverb or delay and devise complex routing for parallel processing of grouped tracks to simulate a more-pleasant-sounding recording room than your bedroom can do by itself and get just the right sound for your final mix.
The possibilities with a modern DAW like Reaper are seemingly endless. (This review is of the latest version of Reaper).
What do I need to get started?
That’s all fine and well, you say, but what do you need besides Reaper to assess this tall claim of possibilities?
A Computer
Reaper works on PC and Mac (Reaper ios) and there’s an experimental build available for Linux. I’ve used Reaper on an Intel i3 with 4 GB of RAM but I really appreciated having extra RAM and a faster processor later.
After upgrading my PC as well as changing my habits in order to conserve processing power, my audio didn’t stutter and pop anymore when I nonetheless frustratingly wanted to hear the processed sound of a particular instrument or bus while recording others and it sometimes worked without having to stop to freeze/render tracks.
Google this subject of freezing or rendering tracks as it’s a pretty important subject in and of itself, especially for electronic musicians out there just starting out. That and latency are great subjects to read up on so as to avoid much frustration in the near future if you plan to give music production a try.
Nevertheless, with all of this said and with knowledge at your side, whatever you have right now might be enough, especially if you plan to record acoustic instruments. If you don’t have a computer and are lucky enough to be able to buy one.
I would highly recommend building your own PC (or having someone build it for you) over getting a Mac or pre-built PC – just understand there’s research involved and some basic skills without which you might ruin some fairly expensive parts. Having an old, clunky, yard sale PC to mess around with can help.
An Audio Interface
In addition to a computer, you will need a good audio interface. A single-input USB audio interface for beginners will run about $100. This will allow you to record one instrument or microphone at a time.
As a solo music producer, this is perfectly fine to get started. Brands that come widely recommended include Presonus and Focusrite.
For what it’s worth, I’ve been using a pre-owned M-Audio interface purchased on eBay which hasn’t had any problems since I got it in 2010. If you’re not afraid of pre-owned gear – and you shouldn’t be – also check out Reverb for good deals. Just be sure, especially on eBay, to check out the seller’s return policy, shipping fees and their reputation before making a purchase.
Headphones
Another thing you’ll need is either a pair of headphones or monitors, which is a fancy name for speakers used specifically for mixing. It took me a while to realize how badly my mixing room sounded but eventually, I learned to use headphones, particularly where the low end is concerned and I’m certain I still have plenty to learn.
It’s odd to rely on headphones because they don’t represent low end very well, but they’re better than monitors in a room which isn’t treated for low-end rumble especially when you learn to listen to reference tracks – your favourite songs played in comparison to your mix to get an idea of where you can improve your mix. If you listen to the bass on your favourite song in your headphones, you can learn to approximately reproduce that sound in your mixes as well.
I recommend closed-back headphones as you can use them for recording, instead of open-back headphones which will bleed noise into your microphone. I have a pair of Audio Technica ATH-M50x headphones and I’ve been pretty happy with them.
Two Turntables and a Microphone
Well, just a microphone, really. If you’re mostly into EDM, for example, you might get by without this and get a MIDI keyboard or other controller instead. However, it’s still a good idea to have something human in your recordings, whether it be an acoustic guitar, vocal, etc.
You can get that without a mic – see: MIDI controller and creating your own samples. There are huge dividends in originality that come with having a mic as no room will treat your sounds for better or worse quite like your (spare) bedroom, living room or wherever it is you plan to set up your home studio, not to mention your instruments and your unique playing style.
Reaper: The Basics and Use Cases
Ok, now let’s get to the fun part of learning how to actually do some recording with this gear, assuming you’ve downloaded and installed Reaper and have your audio interface plugged in via USB. First, we’ll get familiar with some basic settings and buttons to get you on your way to easily recording your musical ideas.
Let’s look at some critical settings and feature set to make sure they’re correct or at least know where to go and stare, wondering why they’re not correct. Coffee or tea helps.
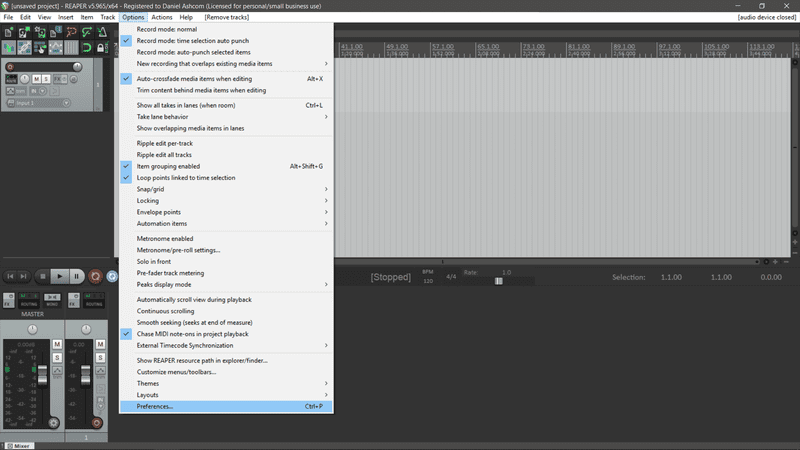
Press Ctrl + P or left-click Options and Preferences (at the bottom of the menu) at the top of the screen and you’ll come to your settings window. In the tall sub-window at the left side of the Preferences window, you’ll see the various categories of preferences started with General at the top.
Scroll down to the Audio section and click Device in the sub-list there. You should set Audio System should to ASIO and below that, click on the Audio Device drop-down box and select your audio interface. Your options will likely be different than mine. Make sure to select ‘Enable Outputs’.
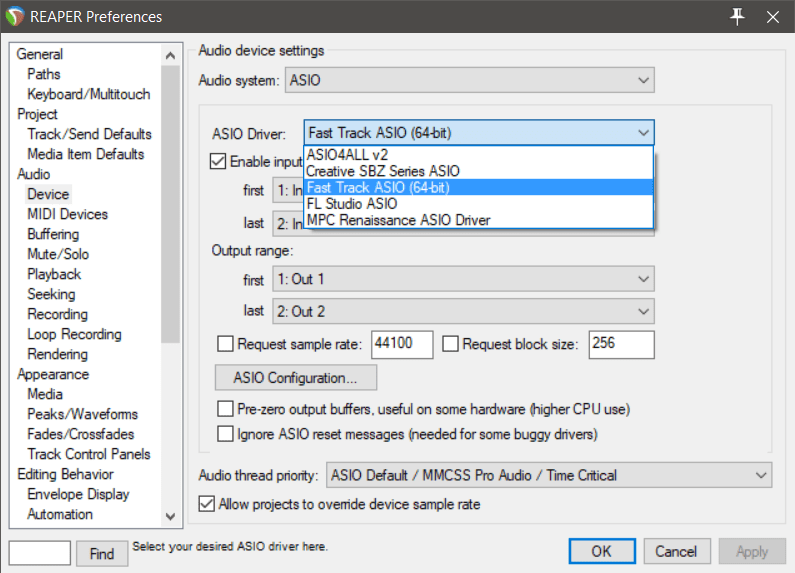
Reaper is highly customizable but the most important settings to get up and running are in the Audio section.
Getting your settings just right
Next, click ASIO Configuration and note how to get back to this setting as you may find yourself tweaking it later. This allows you to set your buffer size which is helpful in dealing with latency issues.
Latency is the time between your action and you hear it from the computer through your headphones or monitors. If it’s noticeable it will make it hard to play your instrument in time and focus on your performance.
You want latency to be as small as possible, or, as I do, you’ll want your audio interface to have a Direct Monitor option to avoid the issue when recording.
The drawback of direct monitoring is that you won’t hear any software-based effects you have on your instrument if you’re listening through your headphones while recording. Another option might be to use pedals or rack-mounted hardware to get your guitar sounds. This way you wouldn’t rely on the computer at all. You can hear your sound as intended to help get the performance right.
It might also be possible to disable all other effects and just run those applied without causing performance issues. I typically record guitar through a small preamp and then add effects later. However, I’m looking forward to getting a few choice effects pedals down the road to get specific sounds without having to rely on my computer to render them.
Running into Trouble
You will run into problems when you try recording for the first time. This happens to all of us. Just be patient, Google your issue with a focused search and you’ll likely find someone else who had the same issue. Reaper offers support, user forums and YouTube are great places to find answers.
I resolved the most common problems I faced early on – particularly in regard to latency mentioned above – by the following steps:
1. Double-checking my hardware signal path was all connected and powered as it should be.
2. Going into Reaper preferences and tweaking some settings along with checking to be sure I was following the steps for recording outlined below.
3. Restarting Reaper and/or my computer.
Be sure to check out the Reaper Video content on Kenny Gioia’s ReaperMania Youtube channel for more detail on setting up your preferences and all sorts of things Reaper-related. Kenny has some awesome resources available. Also, check out the reaper supports guides on the Reaper website.
Sometimes restarting Reaper fixes odd problems and this would be both a criticism and a bit of praise. Reaper is quite stable but quirky. Any problems I’ve had have been pretty easy to fix by way of re-opening a session or toggling settings.
Clicking to disable and then again re-enable recording. Remember to try the simplest things first.
Recording Steps
1. Check that your audio interface is selected in Preferences (Ctrl + P) and Audio Interface.
2. Press the record-enable (red) button on the track.
3. Right-click the record-enable button and make sure your input is set correctly.
4. Click the In button on the record-enabled track and be sure ‘Record: Input Audio or MIDI’ is selected.
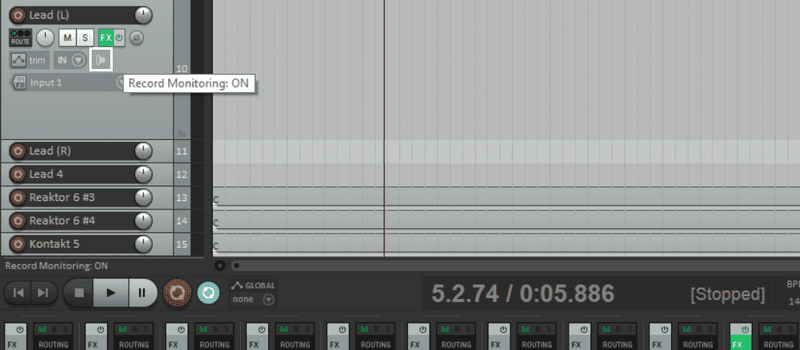
5. Enable record monitoring (optional).
6. Disable all FX by pressing Control and then left-click on the power button icon above one of the FX buttons. (This is optional – for mitigating latency issues, it’s best to record without FX.)
7. Press the big record button in the transport window and recording should start. Don’t forget to enable the metronome if need be or create a drum track in its place in a separate track lane.

Creating a track
After checking that your settings in the preferences section are correct, you’ll want to create a track for recording. When you open Reaper, you’ll start with an empty project with just a master channel. So you’ll need to press Ctrl + T to create a track for recording. What you do next depends on what you wish to record:
– Instrument: connected directly to your audio interface
– Mic’d instrument: a mic connected to your audio interface
– Software-based instrument: entirely inside your computer but (optionally) performed with a controller such as a MIDI keyboard. If you don’t have a controller, you can use your mouse to draw in notes, one by one.
Your basic audio interface will typically have a mic input (XLR) and instrument input (1/4 inch or line-level jack). Sometimes combined and sometimes side-by-side (old-school). If you’re recording an instrument directly into your audio interface, such as a bass guitar, plug it into the ¼” line-level jack. If instead, you’re mic’ing something or someone, you’ll plug the mic into your XLR mic input (has three-prong holes).
However, if you’re recording a software-based instrument such as a soft-synth or a sampled instrument in Kontakt, then you’ll just use your audio interface for listening with your headphones while you record and playback your groundbreaking sounds.
However, you’ll want to connect your MIDI keyboard or controller which I’ll go over it in a minute.
![]()
Nothing but a blank canvas staring at you. No pressure.
Recording with a Mic, Guitar, Instrument
So you are ready to rock out with a mic or instrument cable attached to your audio interface?
Ok. In this case, you’ll arm for recording by clicking on the red record button on the track you’re using. First, you need to check that your recording source is set appropriately.
To do this, right-click on the track’s record button and move your mouse down to the input: section and hovering over input: mono. In the sub-menu which pops up, make sure to select the input on your audio interface.
If you don’t know which it is, trial and error will work. Make sure you enable monitoring to identify it, however, or you won’t hear it through your headphones.
If you’re using a condenser mic that requires phantom power, be sure to switch on phantom power on your audio interface. This will be a switch or button on the unit that says 48V or phantom. If you’re using a ribbon mic, be sure not to do so! You’ll definitely want to read up on phantom power (check the Reaper wiki).
Though it sounds much cooler than it is.

Recording Soft Synth Virtual Instruments
For software-based VST instruments, you’ll still press the record button to prime the track for recording. However, this time when right-clicking the record button, instead of selecting input: mono for mic or line instrument, you’ll hover over input: MIDI.
Then, in the pop-up sub-menu, you should find your USB attached MIDI keyboard or other MIDI performance capturing device. That is, assuming you’ve already got it connected to your computer. I then select all channels for my MPK Mini keyboard.
However, this may vary depending on your device. Again, trial-and-error is your friend here as your situation will have different nuances.
A Quick Note on MIDI Device Issues
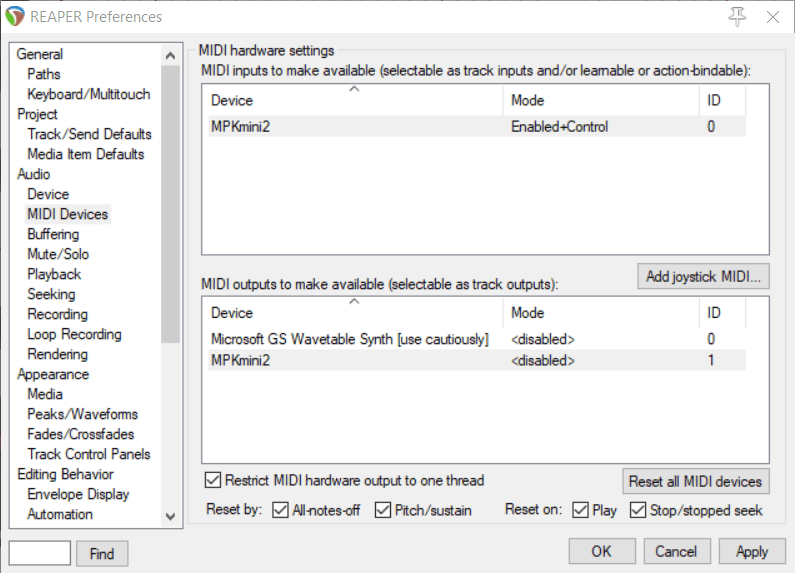
If your MIDI device isn’t working in Reaper do the following. Go into Preferences (Control + P), then under the Audio section at the left, click on MIDI Devices. If you don’t see your device in the box at the right, your computer isn’t physically detecting it. In that case, you might have a bad or loosely-connected cable, device or port.
If it’s showing up but isn’t working, check that mode (to the right of the device name) says Enabled+ Control. Otherwise, right-click the device and click Enable input and right-click again and click Enable input for control messages. Hopefully, this will resolve any issues.
Additional Often-used Buttons and Settings
Besides recording itself, some highly useful features you’ll want to use include soloing and muting, adding FX and routing. Relatedly, you’ll also want to know how to set up a software instrument to play with your MIDI controller.
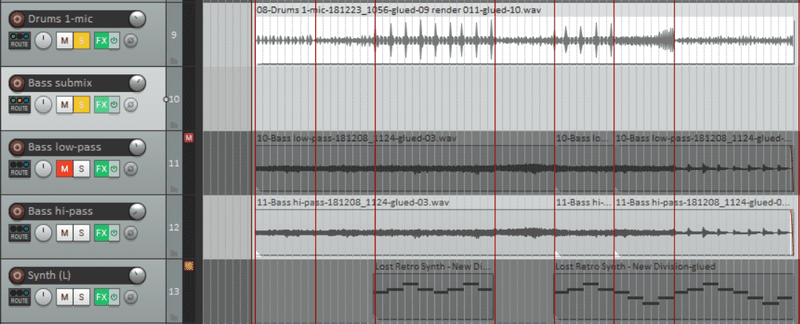
Mute and Solo
Say I just recorded drums to a click track and now I want to lay down a bass track that sits really well with the drums. Using the mute (m) and solo (s) buttons on each track, I can easily solo the drums and bass, and mute or unmute supporting tracks as I wish.
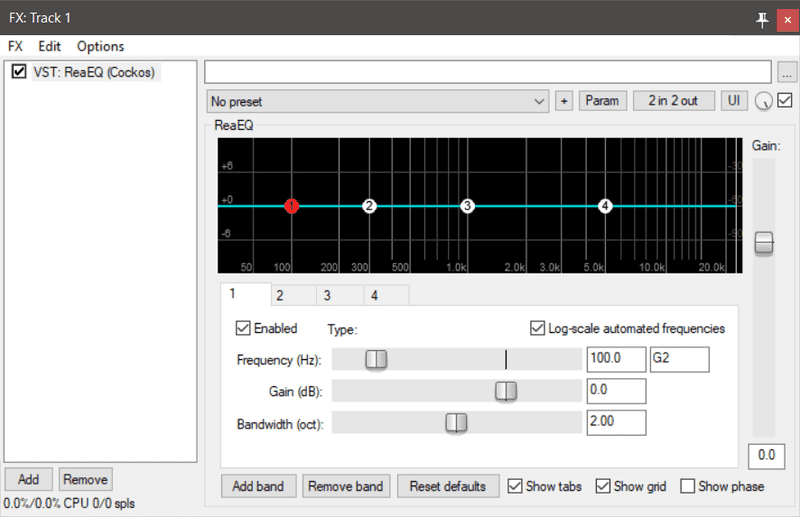
FX and Routing
The next buttons to note are FX and Routing. FX is where you would put your actual software synths that you will be playing via MIDI keyboard as well as any effects.

Click on the grey (or green if already populated) FX button and a window will pop up with a second window if the first is empty. This will show all of the plug-ins you have installed of which Reaper knows the location. If you’re just starting out, that might mean only Reaper’s plug-ins and that’s fine.
If you have 3rd party plug-ins, you’ll have to make sure that the path to their installation location is set in your Preferences under the Plug-Ins section, VST sub-heading in the VST Plug-ins path text box at the right. Make sure to separate entries with a semicolon (;)

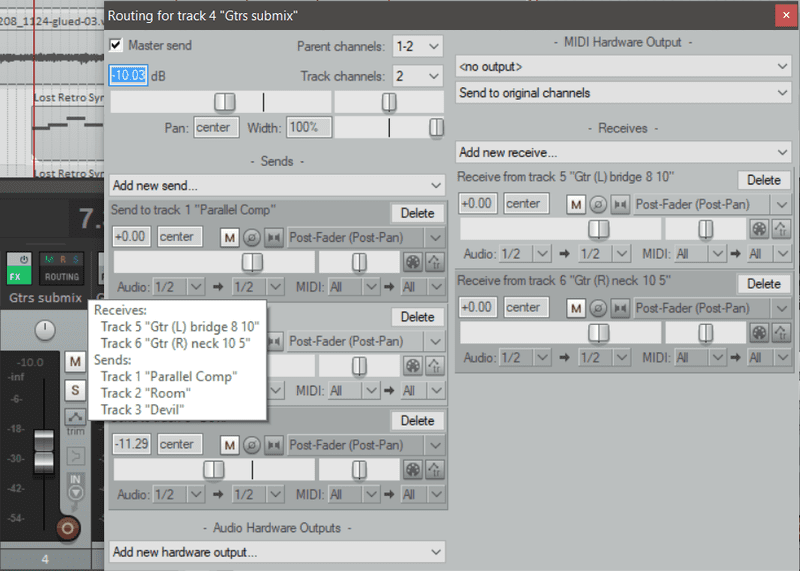
Bussing is done via the Routing button using Sends and Receives. The Master Send checkbox is useful for when you want to control the level of a group of tracks together. In this case, you’d uncheck Master Send on each of these tracks and then send them to a separate track which has Master Send enabled and can also apply FX across all of the tracks at once. This will save precious CPU and RAM resources by using fewer instances of VST plug-ins.
Reaper: What’s in the Box
So, you have your commercial license and assuming you are just starting out and only have what’s in the box. What does Reaper have that’s useful in terms of plug-ins?
Pretty much all the bases are covered from EQ, compression and limiting to reverb, chorus, delay, flanger, etc. I would give it a try with the stock plug-ins for a while and avoid the Waves sales. At least until you get some experience and knowledge under your belt.
Or if you’re going to buy something, buy some software synths, vintage synths or sampled instruments and look online for any available discount license.
Or better yet a keyboard controller if you don’t have one yet. Of course, if you purchase the product, you get the Reaper license key and guys, avoid reaper crack versions. First of all, it’s immoral and secondly, you don’t get the Reaper drivers support and updates.
You can get a lot done with the stock plug-ins that come with any DAW and Reaper is no exception.
What Reaper does Well
Your chosen genre has a lot of influence on what DAW you will likely (eventually) gravitate toward. If you’re into electronic music, FL Studio, Studio One Prime, Sonar Platinum, Cakewalk by Bandlab, Ableton Live or Reason will be well-suited for your purposes.
If you’re into rock or other genres that make heavy use of recorded instruments, then Reaper, Logic Pro X, Pro Tools or even Cubase might be a better option. This is entirely up to interpretation, however, as whatever works, works.
It might be good to do a comparison between Reaper vs Ableton or Reaper vs Pro Tools. See what you prefer yourself. Most have some form of a free trial version available so always worth a try and to test each one out.
Final Tips and Topics for Further Learning
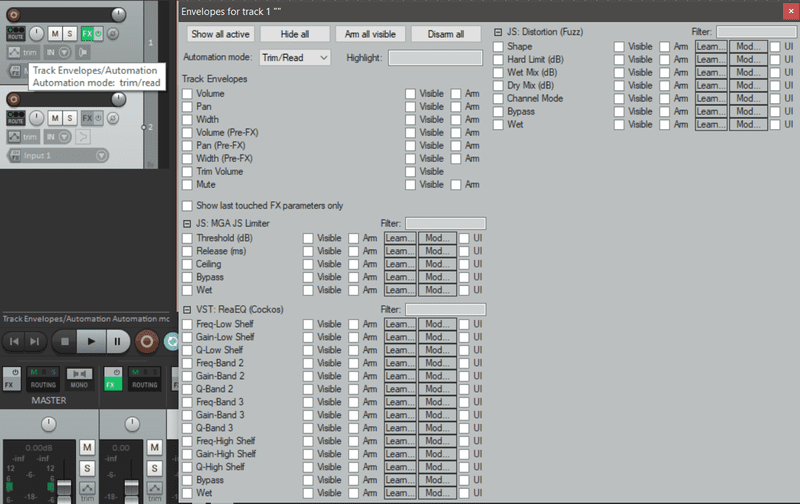
Besides this music software being easy to pick up, Reaper is highly-customizable with themes and key-maps. We haven’t even broached the topic of automation yet! This helps you program soft synth parameters like a pro, not to mention get more precisely-tuned mixes.
 Reaper is easy to learn from