
Getting Started With Cubase
Form a band online, promote your music, buy custom beats, sound parts, and share your Beat or Track as a Royalty Free loop with us. Collaborate to make beats online with the best loop makers from around the world on the Forum for musicians and beat makers. Keep up to date with Music News and learn from FL Studio Video Tutorials and the articles on the Blog. Free DAW Music Software downloads, VST and Instrument Packs for FL Studio, Pro Tools, Logic, Ableton, and how to use the most popular free DAW Software, Fruity Loop Plugins, MIDIs and more.
If you ask the industry-leading music producers about the most comprehensive mainstream Digital Audio Workstation available today, most of them would start a lengthy discourse on Steinberg’s Cubase. This monster from Steinberg was a real gamechanger in the late 90s, and is very much responsible for the way almost every other mainstream DAW is designed and released today.
The VSTi standard which Steinberg introduced in the late 90s with Cubase continues to be a standard across mainstream DAWs for virtual instruments and effects.The Cubase interface is believed to be much more complex than leading competitors like Logic Pro X and Ableton Live. However Cubase loyalists never contemplate switching. Cubase has remained a favourite for film scoring, with continued patronage from stalwarts like Hans Zimmer, Alan Silvestri and James Newton Howard.
Read: A Brief Introduction to DAWs
Let us explore the Cubase interface.
Click FILE and select New Project. You are immediately taken to the Steinberg Hub.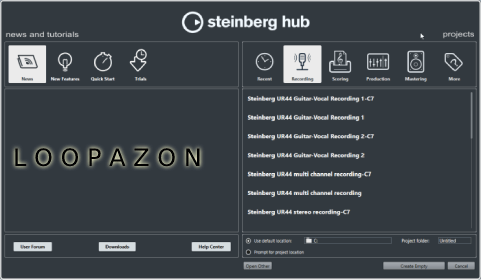
On the left hand side, you get updates from Steinberg including news and tutorials. On the right you can see your recent projects (if any). To open another project that is not listed here, click on open other. However, neither of these options bother us here. If you are a beginner, you are going to start on a blank slate. Let us work on empty project. Please do not forget to set your project location. On the bottom of the Steinberg Hub, you see two options; default location and prompt for project location. Most of you would prefer the latter and we recommend the same. Click on the Create Empty button.
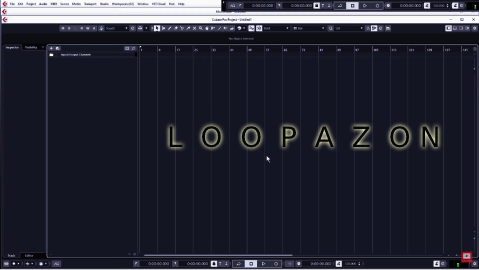
Here you may select your project location. Once you select your folder, you are ready to go on your Cubase interface.
Now you are on a blank session and as a beginner, the first thing you would be scouting for is the built-in sample library. Let us explore this and a lot more on what Cubase calls the Right Zone. (The buttons adjacent to it are obviously Left Zone and Lower Zone as a indicated by the line-markings in them) Click on the Right Zone button on the top right corner of the interface:
![]()
The Right Zone presents you with the media files that you could use in your session, including virtual instruments and loops and samples.
![]()
Instead of straightaway experimenting with virtual instruments, you would want to check out the Loops & Samples section as a beginner. Clicking on it would load the built-in loops and samples library.
Click on the desired sample pack to explore it. Each library may contain hundreds of samples.
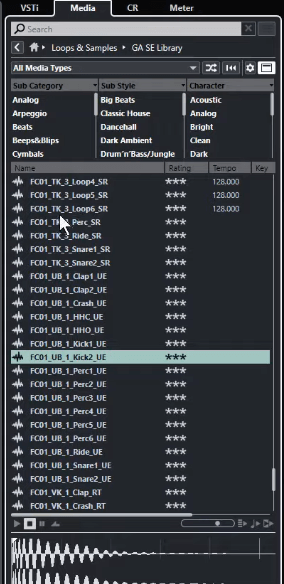
Thus make sure you enable audition by clicking here.
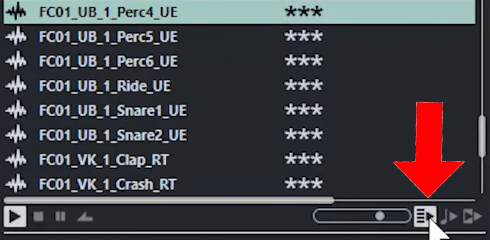
By doing this, the samples play automatically as you browse through them, making your selection process quicker while you are in a session. Cubase also has filters like sub-category, sub-style and character that further simplify your search. Once you find the track, you may simple drag it to your timeline. Alternatively, you may right-click on the sample and select create sample track. In this case, Cubase creates a sample track on your timeline. You can see the same on your sampler control, a feature that was introduced in Cubase 9.

If you have previous projects, then the Cubase 10.5 lets you import tracks from them. You may select individual tracks from existing projects and import them to your current session. The process is quite simple. You just need to be familiar with your other projects, to know exactly what fits into your current one. The feature is handy if you are working in a continuous assignment, like say episodes of a web-series.
To do this, go to the file menu, select Import and then select Track from Projects from the sub-menu.
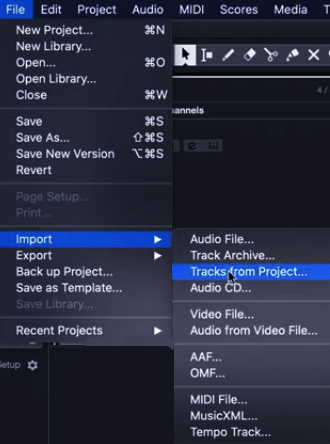
After this, locate the project you want to import from and open it. You get the entire list of tracks from the project.

You can select them either in groups (folders) or individually.
The imported tracks will by default appear as separate tracks in your current session unless you have customized it before import (to appear in existing tracks).
The Left Zone contains all the track settings. You can make adjustments to the media/tracks on your timeline here.

For instance you want to adjust the volume of your first track. Just drag your cursor on the control against the volume symbol above. Always remember to keep your volumes at optimum levels, but not very loud as you would be working with multiple tracks. Anyway, you would want to make a final adjustment to each track once you have all the tracks laid out.
Now let us work with a MIDI track. Select the BAR you want to place your MIDI block/segment in. The bar numbers are on top of the timeline. Use the Zoom-In/Zoom-out control at the bottom to enlarge your view to see each bar separation.
Click on the Pencil icon on your toolbar. This is your draw tool. Click and drag the draw tool on the section/bar where you want your MIDI block/segment to be in.

Remember, this is your MIDI block. Just like your MIDI keyboard, it does not produce any sound of its own. You would already have selected and instrument or sample for the track. To play the instrument in the selected bar, you need to load your Piano Roll.
Here too, you may draw your sequence using the pencil/draw tool. The sequence is reflected on the respective MIDI segment on your track. You can edit your sample by adjusting its length or chopping out portions at the beginning or tail, in the sampler control tab on the Lower Zone. To loop the track, use the draw tool again and select the segment by drawing through the bar numbers above the track. Then click on the activate cycle button located on the Transport Panel, at the bottom of the interface.
![]()
Read: Getting Started with GarageBand
Recording Audio
By now, you have a basic idea on how to work with a built-in resource in Cubase. You know to add and edit a MIDI track on your timeline. Now let us see how to record audio. You need a separate audio track for this. To add a separate audio track, go to the Project Menu, select Add Track and click on Audio.
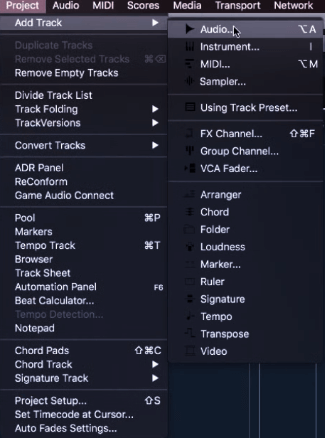
Here you should make sure that you set your audio track to mono.

A new audio track will be added to your timeline.
![]()
Press F4 to open the Audio Connections window to set your Input Routing:
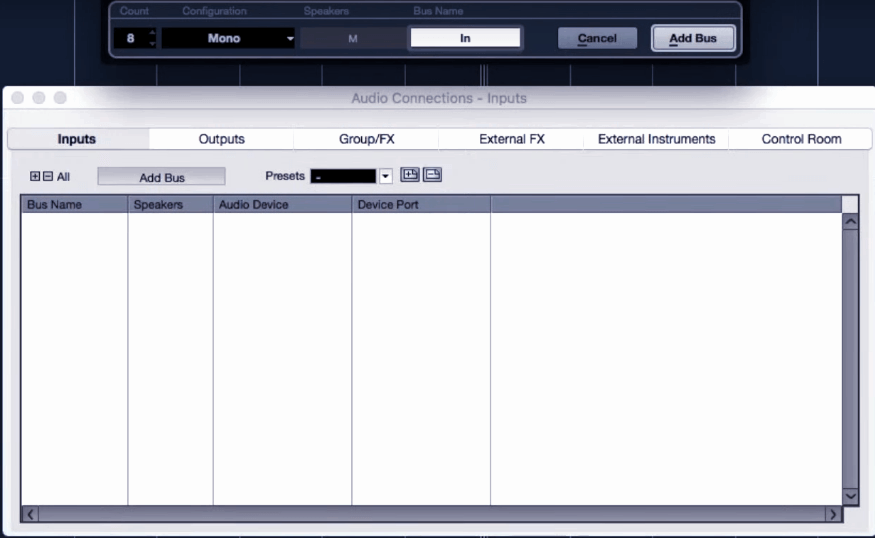
Set your number of inputs, name the bus and click on Add Bus.
You can additionally save it as a present. Click on the + button.

Going back to the timeline, you will see No Bus against your audio track. Your input routing is only complete when you allot the exact input no. to the track. Click on it and choose your input.
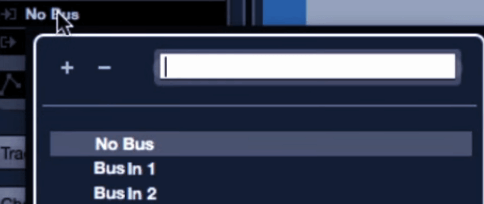
Choosing BusIn1 or BusIn2, will allot that particular input from the external interface to the selected audio track. Thus, you input routing for the track is complete. You may do the same with multiple inputs, routing them to other audio tracks. You can allot the same source to multiple tracks, if you are recording different instruments or vocal layers from the same input source like a condenser microphone.
To record the input, click the record button on your track.
![]()
Your input from the source (BuIn1 or BusIn2, whatever you selected) will be recorded to your timeline.
There are various exporting options in Cubase which you would learn on the go. This much would suffice to get you started with Cubase.