
Audacity Tutorial for Beginners ♬ Guide
Form a band online, promote your music, buy custom beats, sound parts, and share your Beat or Track as a Royalty Free loop with us. Collaborate to make beats online with the best loop makers from around the world on the Forum for musicians and beat makers. Keep up to date with Music News and learn from FL Studio Video Tutorials and the articles on the Blog. Free DAW Music Software downloads, VST and Instrument Packs for FL Studio, Pro Tools, Logic, Ableton, and how to use the most popular free DAW Software, Fruity Loop Plugins, MIDIs and more.
There are dozens of applications for aspiring audio editors to start experimenting with. However most of the fully-loaded ones are either prohibitively expensive or come along with other software packages. If the purpose is to just record, edit and export audio in professional quality, then you don’t really need a DAW.
Read: A Brief Introduction to DAWS
For instance if you are recording and editing audio for a college project, you needn’t take the pain of getting acquainted with the comparatively complex interface of a DAW, even if it is an inexpensive application like REAPER or a free one like GarageBand that comes with Apple devices.
Read: Getting Started With GarageBand
All you need is an exclusive audio-editing application that delivers professional quality without limitations.Adobe Audition has been an industry standard and thus the most recommended application as it comes with premium features. But again, it would cost you approximately $21 per month.
Amateurs, hobbyists and rookies are not expected to shell out that much on a monthly basis. For them, there is Audacity, a comprehensive audio editing tool that comes totally free of cost. You may be thinking of it as a basic, scaled down version of another professional application. Well, gladly it isn’t. Audacity is a part of the FOSS (Free and Open Source Software) movement.
You get unlimited access to all its resources at zero expense. By saying all its resources we don’t just mean the application with all its features. You get complete access to its entire source code! Audacity is open-source and passionate developers from around the world have been contributing to make bug fixes and improving the existing code. Over the years Audacity has grown into a stable and feature-rich competitor to its proprietary counterparts and is available for Windows, Mac and Linux users.
With close to 200 million downloads from SourceForge, Google Code and FossHub, the Audacity is among the most downloaded software applications in the world. The number of downloads on FossHub alone clocked 93.2 million in June 2020. The earliest versions were completely conceived and developed by Carnegie Mellon students Dominic Mazzoni and Roger Dannenberg in late 1999.
The first public version called V 0.8 debuted on May 28, 2000. Twenty years later, Audacity still remains the starting point for those aspiring to become audio editors, sound-editors and even music producers. Being aligned to the Free and Open Source Software (FOSS) movement has accelerated its growth over the years. The developers have consistently striven to maintain its user-friendly interface. Thus, even being a total newbie without previous editing experience, you can straightaway lay your hands on Audacity without intimidation.
Let us skim through the basics of Audacity:
This is the 2020 interface of Audacity.
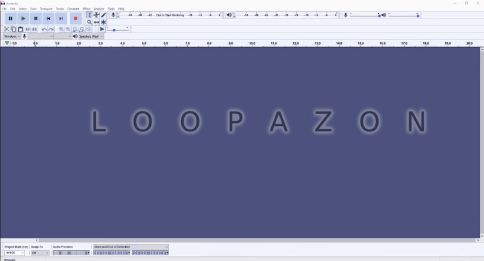
There have been several stylistic changes over the years, besides frequent addition of features. However the characteristic simplicity has been retained and you can straightaway start fiddling with Audicity if you have worked on a previous version long ago. First-timers too would be relieved on seeing the minimalistic interface.
On the top-left side of the interface are the PAUSE, PLAY, STOP, SKIP TO THE END, SKIP TO THE START and RECORD buttons. The functions of course, are self-explanatory. It should be noted that the PAUSE button not only lets you PAUSE your playback, but also your RECORDING. You may resume the recording later.
Towards the right are your volume controls. The first one is to adjust the INPUT level for your microphone and the one adjacent to it is to adjust your playback level.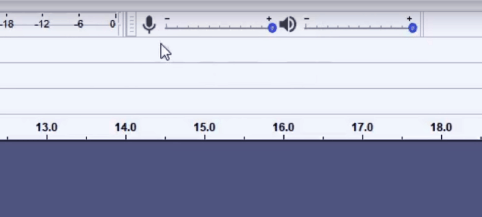
You can adjust your playback speed here:
Irrespective of the speed you record in, you can determine the playback tempo here. However, this is only recommended for making minor alterations. The input quality and the texture of voice/sound could be adversely affected if this is used in the wrong way. Many of you would already be knowing this, if you have tried this in video players like VLC before. So make sure your tempo of recording is exactly what you want in your output.
The microphone settings above too is self-explanatory.
You may select your playback device (Speaker/headphone) from here: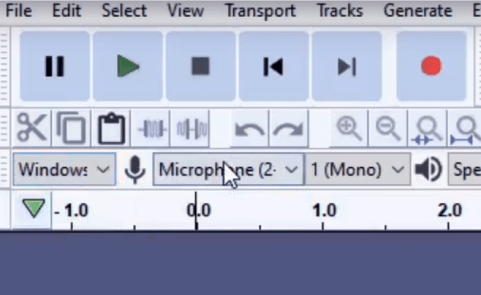
The Zoom-in and Zoom-out controls are handy while recording long audio tracks. You can Zoom into the track and make manipulations and edits. Enable the ZOOM control, and left-click on your mouse to Zoom-in and right-click to Zoom-out.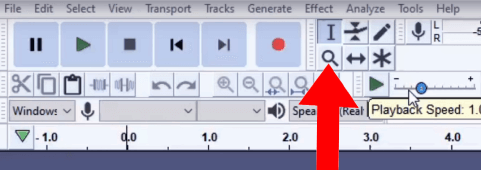
The double-edged arrow button next to it is your TIME-SHIFT tool.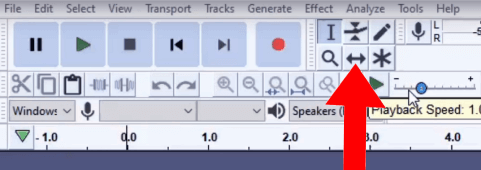
This is used when you have multiple recordings on a single track. You may click and drag a particular recording to any position (timestamp) in the track.
Once you have set up your input and playback devices, you may try out the most important functionality of Audacity, RECORDING.
A glimpse of the interface would have given you enough idea how to go about this simple function. Click on the RECORD button, provide input through the selected microphone and click on stop when you are done.

As mentioned earlier, Audacity also allows you to PAUSE you recording in between and resume later.
Once your track is recorded, you may perform the necessary edits on it. For instance, you want to remove gaps in your recording. Use the Zoom-in tool to get a magnified view of the portion you want to chop off. Then, click on the SELECTtool, located above the zoom button.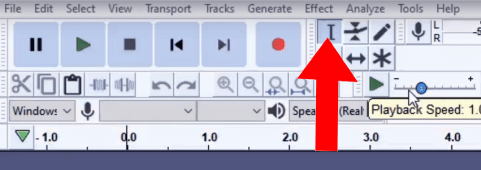
Click and drag to select the portion of the audio you want to remove. Hit the DELETE key on your keyboard, and you are done.
Next to the SELECT tool is the ENVELOPE tool that is used to control the volume levels in your track.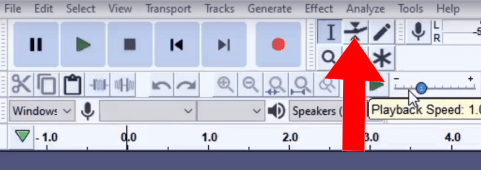
Click on the envelope button to enable it and click and drag the upper edge of your track vertically to adjust the volume level of your track.
(You may adjust the gain on the track controls.)
Adjacent to the ENVELOPE tool is the DRAW tool that is used to make modifications to the waveform at its most minute levels, by zooming in to the track.
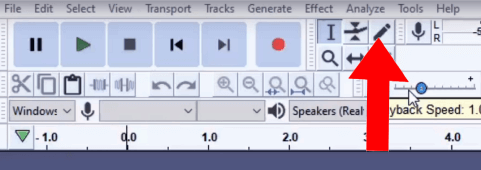
This is usually used for music recordings or professional podcasts.
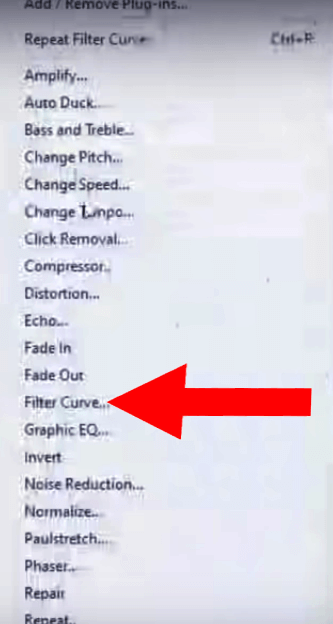
Now the highlight of Audacity is that it allows you to add a number of effects presets to your recording. Suppose you are recording an audio message in your voice. Any average individual would desire a certain amount of processing to his/her voice and add a certain level of broadcast quality to it. One of the first such desires would be augmenting the bass levels of your voice in the recording. This can be done very easily on Audacity, in a couple of steps. Select your recording and go to the Effect menu and choose Filter Curve. This is one of the latest features in Audacity that simplifies the process further.
On the Filter Curve window, click on the Manage Button, select Factory Presets. You will find Bass Boost among the several other presets (Treble Boost, Treble Cut, AM Radio etc.)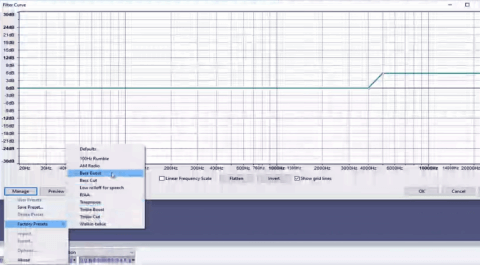
Clicking on Bass Boost would add the effect to the track and you can see the change in the Filter Curve.
You may also manually make further modifications by clicking and dragging on the curve. Click OK to apply the effect to your track.
Besides the Filter Curve, the Effect Menu contains a host of other effects such as ‘Change Pitch’, ‘Auto Duck’, ‘Compressor’, ‘Fade-In’, ‘Fade-Out’, ‘Graphic EQ’ etc, which you would get acquainted to once you start your trial and error game on Audacity.
Go to the File Menu and click on Save Project to save your Audacity session. Saving the project file allows you to come back and make changes to the recording any time.
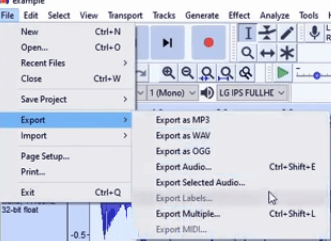
To EXPORT your audio, go to the File Menu and select on EXPORT and choose your output format.
Save the file on your desired folder. After this, the METADATA window would pop up on Audacity where you can fill the media information for your audio file.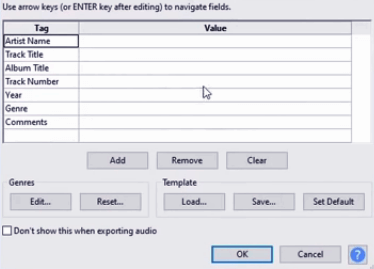
So that much would give a fairly decent understanding of the basics of Audacity. Download it for free and start experimenting!
Read: Introduction to Sampling