
Introduction to FocusriteRedNet R1
Form a band online, promote your music, buy custom beats, sound parts, and share your Beat or Track as a Royalty Free loop with us. Collaborate to make beats online with the best loop makers from around the world on the Forum for musicians and beat makers. Keep up to date with Music News and learn from FL Studio Video Tutorials and the articles on the Blog. Free DAW Music Software downloads, VST and Instrument Packs for FL Studio, Pro Tools, Logic, Ableton, and how to use the most popular free DAW Software, Fruity Loop Plugins, MIDIs and more.
Introduction to FocusriteRedNet R1
The FocusriteRedNet R1 gives consumers unprecedented control over their audio system. It gives you the freedom to operate a variety of monitor output arrangements, from mono to 7.1.4 surround, as well as Dolby Atmos and other immersive audio processes. And, for unique speaker combinations, totally custom setups of up to 12 outputs can be established. RedNet R1 can concurrently and interchangeably control groups of outputs from a Red interface's myriad of sources and destinations, including Pro Tools | HD and other DAWs, analog inputs and outputs, ADAT and S/PDIF connections, and complete Dante audio ecosystems.
RedNet R1 will allow you to control the Focusrite Red interfaces' remote-controllable mic preamps in a recording studio, allowing you to retain the interface in the rack and clear the desktop. You can communicate with talent in other rooms using the built-in talkback microphone, and you may examine mixes on different monitors in surround, stereo, or mono. You may listen to the solo vocals by selecting that source on the headphones.
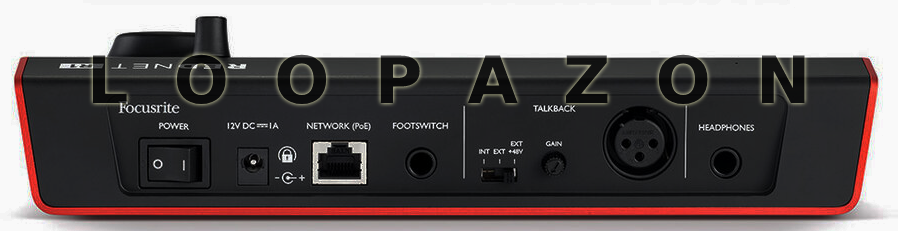
The RedNet R1 also has a Dante-enabled talkback section, an integrated mic-pre, and a high-powered headphones output, allowing you to communicate with your Dante system in ways you've never experienced. You may create up to four talkback destination groups when using a Red interface. A single talkback group is accessible when paired with additional Dante devices. The integrated microphone on the RedNet R1 may be used, or people can attach their own microphone through the XLR on the back panel. The high-fidelity headphone output is capable of delivering high-SPL music to headphones with high resistance. There are some features of the RedNet 1 given below You may work in several immersive formats, including Dolby Atmos, with monitor setups ranging from mono to 12 channel 7.1.4 surround sound. Flexible monitor controls comprise level, preset level selection, lock, dim, mute, and various solo modes.
You may monitor multiple mixdowns of the present source to assure quality in each format with four distinct output formats. When dealing with several surround formats, easily fold down utilizing the output buttons to ensure a seamless workflow. RedNet R1 also includes talkback technology, allowing you to communicate with talent in another place quickly.
Users can utilize the built-in internal microphone or attach their own through the XLR on the back panel. Switch between monitoring settings with an A/B switch.
The RedNet Control program, which has a hardware-focused workflow, is designed to rapidly set up basic or complicated settings.
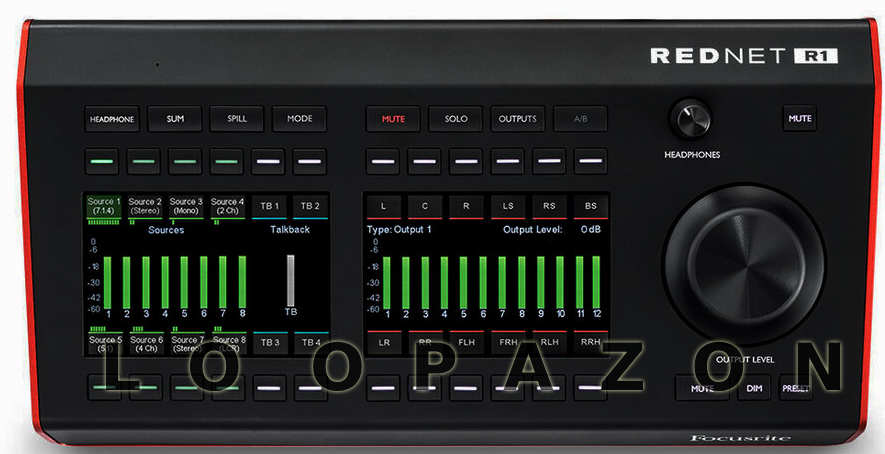
Two LCD displays are included in the RedNet R1 for exact level metering of the outputs, sources, and headphone outputs and providing visual cues to navigate menus. A quarter-inch jack socket takes a footswitch for talkback control, LFE muting, and other capabilities of the RedNet R1. It may be supplied either by a DC power source or by Ethernet to decrease wiring complexity
Function Keys
The device's operating mode is selected via the eight Function keys. The colour of a switch indicates its status: if there is no light, it means it can't be selected, and any other colour indicates that it is not passive. The choices and sub-menus accessible for each function are displayed on screens 1 and 2 beneath each set of four buttons. The twelve soft buttons given with each screen are used to choose options.
Headphone
Switches from Speakers/Monitors to Headphones as the input source. While the headphone source is selected, the button turns orange.
To change the input source, the soft buttons 1–4 and 7–10 are used.
To raise or lower the volume of a single source, Turn the Output Encoder by pressing and holding a button. A red 'M' indicates that the channel is on mute.
In order to activate talkback:
To activate talkback to the chosen location, press soft buttons 5, 6, 11, or 12. The action of a button might be clamping or transient.
Sum: Switches between inter-cancel (single) and summed selection methods for Source Groups. The output level gets automatically adjusted to keep up a consistent volume as summed sources. If you select 'Summing behaviour' from the Tools menu, they are added or withdrawn.
Spill: Provides a detailed explanation on a source to reveal its component channels, which can be individually muted or unmuted
Choose a source to get details.
The source, which has 12 channels, will be shown on Screen 1.
The soft buttons can be used to mute or un-mute the channels. A red 'M' indicates muted channels.
Mode: Select one of the following submenus: 'Monitors,' 'Mic Pre,' or 'Settings': The Monitor will Access the current speaker/monitor or headphone selection mode. The Mic Pre helps to access the hardware controls of a remote device.
To operate a remote device, press soft buttons 1-4 or 7-10. The device settings are controlled via buttons 1-3 and 7-9. Talkback is enabled by pressing buttons 5,6,11, and 12. The output makes you to set the global output level without changing modes:
To alter the global level, press soft-button 12 and rotate the Output Encoder.
'Gain Preset' gives six locations where a gain value can be stored. A stored value can then be applied to the currently selected channel by pressing the suitable Preset button
To set a preset value:
The Output Encoder should be rotated to the needed level after selecting a Preset button.
To change the value, press and hold the button for two seconds. To come back to the mic parameter display, the 'Mic Pre Settings must be pressed.
The Settings lets you access to the Global Settings submenu:
Talkback Latch makes you to Switch between the momentary and latching operation of the talkback buttons.
-
When Auto Standby is enabled, the TFT displays will turn off when they are not active, including no metering adjustments, switch pressing, or pot movements. By pushing any switch or moving any Encoder, the system can be awoken. Note that the initial switch push or pot movement will have no impact other than to wake the machine, to prevent unintended configuration modifications. The Mute and Dim buttons, on the other hand, are exceptions and stay active; thus, hitting one of them would make the system active.
-
When the Output Encoder is rotated, it will change the brightness
-
The Device Status will display the device's hardware, software, and network settings, as well as the device under control's settings (DUC)
-
Mute: Individual loudspeaker channels can be muted using soft buttons. A red 'M' indicates muted channels.
-
Solo: Individual loudspeaker channels can be soloed or un-soloed using soft buttons. When you 'S,' that means Solo status. Go to Output Menu to set the Solo mode
-
Outputs: This allows you to choose the channel output format and the Solo button's operation mode. There are four slots for Outputs 1, 2, 3 & 4.
-
A/BAllows you a fast comparison of two speaker arrangements. The RedNet Control Monitor Outputs menu is where you set the A and B settings.
Conclusion
RedNet R1 accepts up to eight input sources from 32 audio channels and mixes and routes data to 12 monitor output channels through analog, digital, DAW, and Dante connections. Level, reference level preset selection, cut, dim, mute, and several solo settings are all available on the top panel. There's an A/B switch for quickly switching between several monitoring settings, and up to four fold-down presets allow for quick downmix checks. Any of the 32 available inputs may be used to send custom cue mixes to talent.
The Focusrite R1 is a fantastic piece of hardware. Any flaws stem from a few Red series constraints than from the device. If you're utilizing a Red series interface and don't have enough hardware monitoring channels, then you must try R1. It will simplify the use of your Red series interface by requiring significantly less window switching to activate or stop hardware monitoring and control monitor outputs. The headphone amplifier is pleasant to listen to, and having on-device talkback is quite helpful.
FAQ
No FAQ found