
Soundop - Professional Audio editor
Создавайте группу онлайн, продвигайте свою музыку, покупайте собственные биты, звуковые партии и делитесь с нами своим битом или треком в качестве лупа без лицензионных отчислений. Сотрудничайте, чтобы создавать биты онлайн с лучшими производителями лупов со всего мира на Форуме для музыкантов и создателей битов. Будьте в курсе музыкальных новостей и изучайте видеоуроки FL Studio и статьи в блоге . Бесплатные загрузки музыкального программного обеспечения DAW, пакеты VST и инструментов для FL Studio, Pro Tools, Logic, Ableton, а также способы использования самого популярного бесплатного программного обеспечения DAW, плагинов Fruity Loop, MIDI и многого другого.
Soundop - A great tool for professional audio editing
Soundop
is a professional audio editor software for Windows-based computers
to record, edit, and master audio files. Soundop features a concisely
designed interface with a comprehensive set of features.
Soundop
facilitates both spectral and waveform editing with the audio file
editor. It is powered by a strong engine that supports side-chain and
automatic latency compensation, thus enabling you to work with an
infinite numer of audio trakcs and bus tracks. It also features a CD
track editor that allows you to burn audio files to a compact disk.
With the batch processor, you can process multiple audio files
together and save them in your desired format.
Features of Soundop
-
Enables you to record and playback audio files with DirectSound, WASAPI, MME, and ASIO drivers.
-
It also enables you to perform a Set channel mapping for all audio devices.
-
With the loopback recording system [WASAPI] you may record your audio clip up to24-bit and 192 kHz.
-
Soundop allows you to work with your favorite ACID loops and also mark and edit loops.
-
It can also crossfade sample loop ends as well as search best sample loop position automatically. It allows you to crossfade sample loop ends. You can search the best loop position, which can also be done automatically.
-
Soundop lets you edit metadata within the ID3 tag, Vorbis comment, RIFF, AIFF, and other formats. Interestingly, it also lets you edit cover art for MP3 and FLAC files.
-
You may record audio with insert mode and overwrite mode. The overwrite mode replaces the existing recording with the new one. You may also schedule your future recording.
-
Performs a sequence of editing and processing operations to a predefined time and frequency range with processors.
-
Soundop lets your normalize amplitude and take away dc offset
-
Soundop lets you record simultaneously from multiple input devices.
-
The application also automates track and clip effects with the read, write, latch, and touch mode.
-
Soundop has well-designed built-in effects and supports VST and VST3 effect plug-ins, and supports parallel or mid-side effect groups to form composite effects. Soundop supports both VST and VST3 plugins. Besides, it supports parallel effects to create composite effects. Soundop also has a favorable set of built-in effects.
-
With the FX rack on Soundop, you can apply an array of effects to the you audio.
-
Soundop lets you generate speech, tonal audio and colored noise from text.
-
Soundop also lets you to locate unwanted noise easily with Spectrogram. You can remove this with spectral editing.
-
Soundop also facilitates seamless processing of audio with high-quality built-in effects like reverb, delay, chorus EQ, flanger, phaser compressor, limiter etc.
-
Organize effects as one effect with FX group, Mid-Side Splitter, and Parallel Group effect. You may organize multiple effects with FX Group, Parallel Group effect and the Mid-Side Splitter.
-
Customize keyboard shortcuts to your convenience for all project types.
How to Record and Edit Audio in Soundop
The first important step is to set your default audio device. As already mentioned, ASIO and MME are among the devices supported by Soundop for recording and playing back audio. The default device is set in Audio Device Preference. You may set multiple input devices to audio tracks to on multiple devices concurrently.
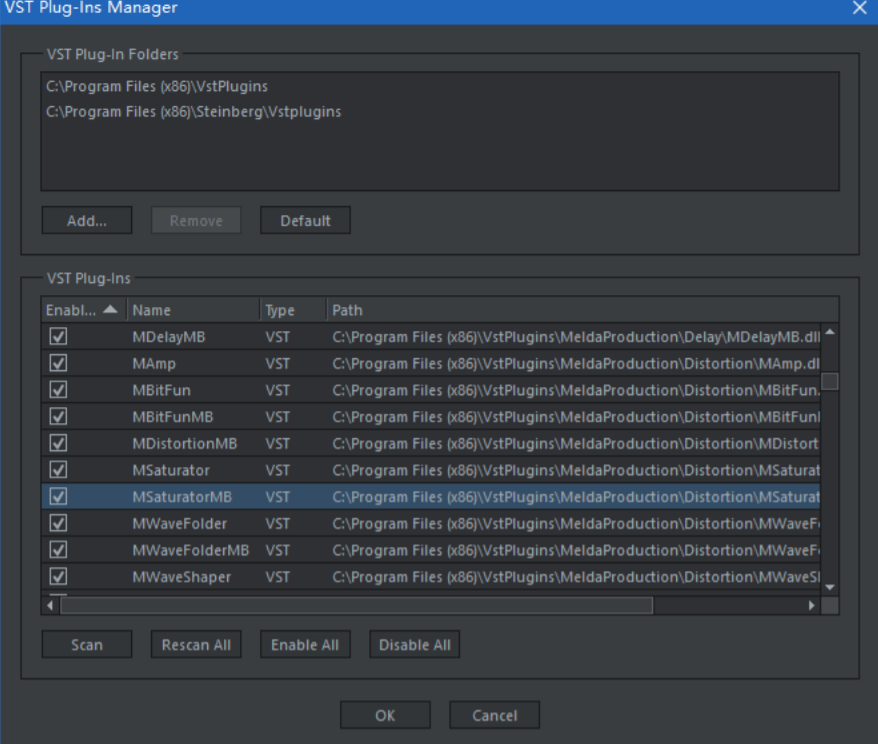
To manage VST plug-ins later, choose Options > Manage VST Plug-Ins.
Audio File
• Click on Files and select Recent Audio Files.
• Open the audio file and drag and drop it to the panel or Audio File Editor.
• You can also open audio files from the Start Panel or the Browser.
• You can drop to Multitrack Editor to feature clips to audio tracks. You can also use the CD Track Editor to feature CD tracks. Use the batch processor to feature each of them on the process list.
When an audio file or a mixing project is opened, the audio content is displayed in Editor panel. Each component is listed as marked in the following image.
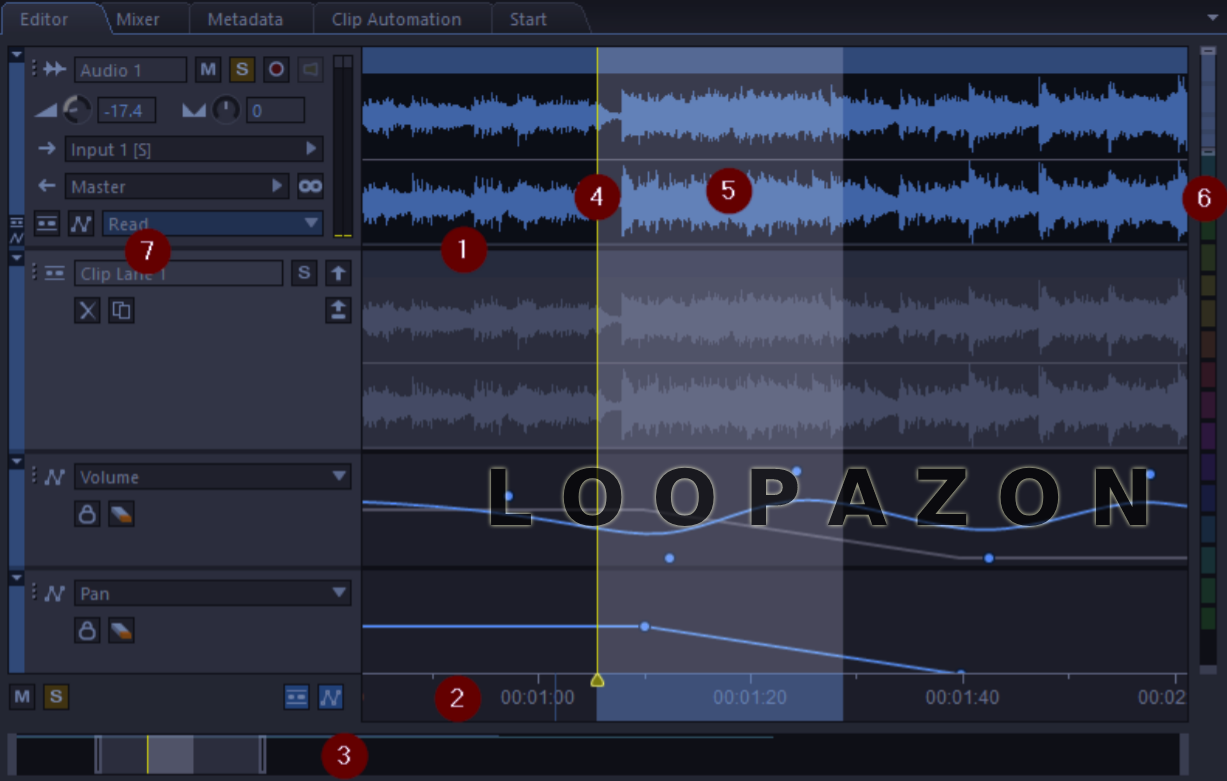
Components within the audio file editor:
1. Waveform view.
2. Spectrogram view.
3. Time ruler.
4. Time scrollbar.
5. Edit-cursor/play-cursor.
6. Time selection.
7. Amplitude meter.
8. Frequency meter.
-
There are multiple ways to navigate audio in time.
In the waveform view, spectrogram view:
• Roll mouse wheel to zoom at mouse position.
• Shift + roll mouse wheel to scroll horizontally.
In the multitrack view:
• Ctrl + roll mouse wheel to zoom at the the mouse position.
• Shift + roll mouse wheel to scroll horizontally.
-
After navigating, Click on Selection / view panel and set the view range by changing the worth in time edits.
-
Now, select time selection tool and involve view.
-
Drag left or right fringe of the choice to stretch time range.
You may control playback with the Transport panel or commands in the Transport menu.
-
To play the audio from a particular position:
1. Set your cursor to the position.
2. Click the Play button to begin playback.
3. Click the Pause button to pause or resume playback.
4. Click the Stop button to stop playback.
-
To play different segments from your time selection, use the Transport menu.
-
To Loop playback, toggle the loop button on.
-
To scrub audio:
• Choose Transport > Shuttle Right to increase the speed of the playback forward
• Choose Transport > Shuttle Left to hurry up playback backward.
• Choose Transport > Shuttle Stop when done.
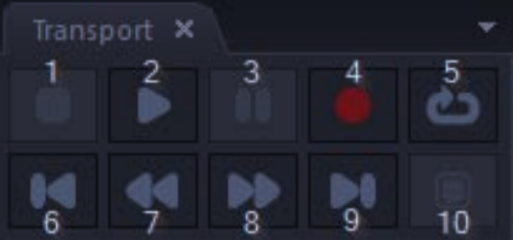
1.Stop.
2. Play.
3. Pause.
4. Record.
5. Loop.
6. Cursor on PREVIOUS.
7. Rewind.
8. Fast forward.
9. Move cursor to NEXT.
10. Stop in alternate mode.
Steps to recording audio:
-
Set cursor to start position or select gour time range to record on.
-
Click the Record button in Transport panel to start your recording.
-
Click the Stop button in Transport panel to prevent recording
-
Also click Pause button in Transport panel to pause or resume recording.
While recording, you may monitor the input levels with Levels panel.
Remove noise with noise profile
-
Select a segment that contains only background signal.
-
Choose Tools > Capture Noise Profile.
-
Set FFT Size to alter the resolution of noise profile.
-
Apply noise reduction
If the noise profile has been captured already, you'll have the noise pattern removed within the profile with noise reduction:
-
Select a segment to use noise reduction, or clear selection to use to any or all.
-
Choose Tools > Noise Reduction.
-
Adjust parameters and preview effect before applying.
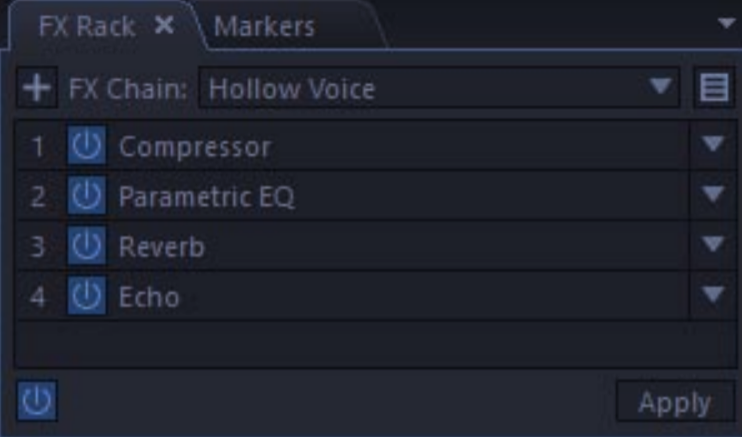
-
Now, add effects to FX rack, change parameters and preview the effect by playing back the audio selection.
-
Click Apply to apply the above effects and then clear the FX rack.
To insert silence, set your cursor to the insert position or select the time range to add/replace segment with silence.
-
Choose Edit > Insert Silence and set the length of silence. Inverting Audio Inverting audio data will rotate the audio phase by 180 degrees.
-
Select the audio data to be inverted or clear selection to invert all.
-
Choose Tools > Invert. Reversing Audio
-
Now, select the audio data to be reversed or clear selection to reverse entire audio.
-
For that, choose Tools > Reverse.
If you want to edit only the audio data within a very specific frequency range, make a spectral selection first.
To create a spectral selection:
-
Select the Marquee tool.
-
Then, drag out a rectangle on the spot within the spectrogram view.
-
Finally, the spectral selection will be adjusted by dragging edges and corners of the rectangle within the spectrogram view.
For many editing operations, zero-crossins are best points to avoid audible artifacts at edit boundaries.
To adjust selection edges to nearest zero-crossing points, user must choose commands under Edit > Zero Crossing.
Once your audio file is ready to export, you can choose from the following options:
-
Choose File > Save to - For original format and site.
-
Choose File > Save On - to save to a new location or format.
-
Choose File > Export - to export audio contents to a brand new file.
-
Choose File > Export Selection - to export only selected audio to a replacement file.
Conclusion
Soundop supports loading audio from all popular audio and video formats and exporting audio to major audio formats with metadata like ID3 Tag, RIFF Chunk, Vorbis Comment, and ACID loop edited and saved across formats. The supported formats including MP2, MP3, AAC, OGG, FLAC, APE, WAV, AIFF, and WMA. Soundop isn’t the best when compared to better options that are free, especially those that comes with a much larger built-in fx library. However, Soundop is quick and concise and is certainly one of the better options available for sound-editing.