
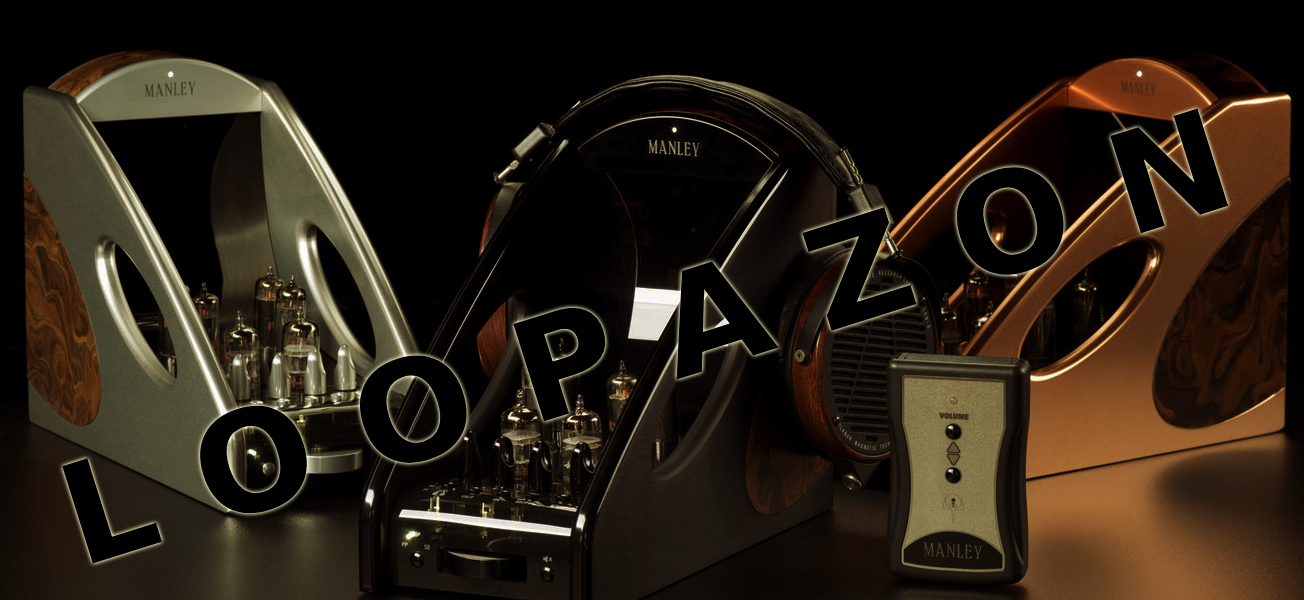
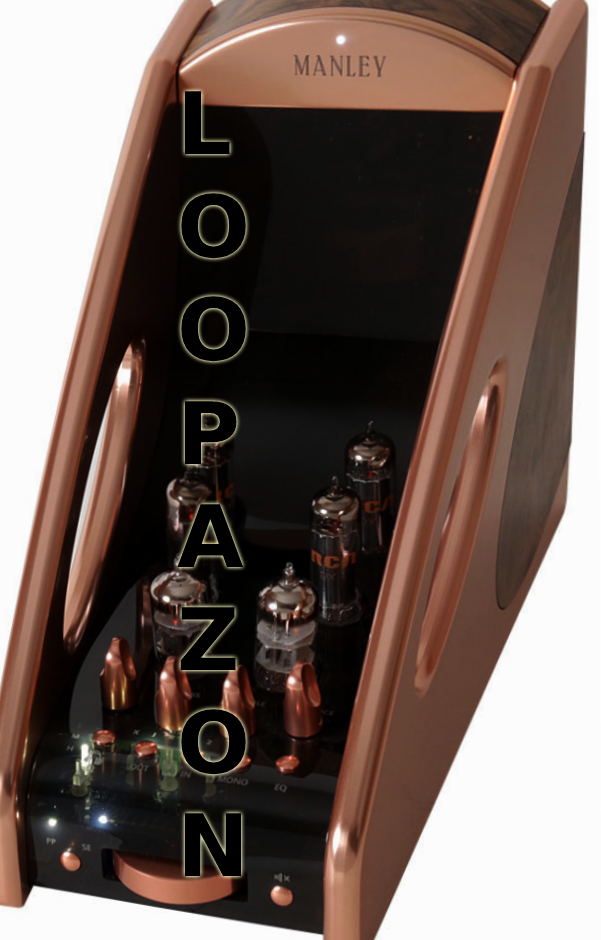
The MANLEY Absolute Headphone Amplifier
Form a band online, promote your music, buy custom beats, sound parts, and share your Beat or Track as a Royalty Free loop with us. Collaborate to make beats online with the best loop makers from around the world on the Forum for musicians and beat makers. Keep up to date with Music News and learn from FL Studio Video Tutorials and the articles on the Blog. Free DAW Music Software downloads, VST and Instrument Packs for FL Studio, Pro Tools, Logic, Ableton, and how to use the most popular free DAW Software, Fruity Loop Plugins, MIDIs and more.

The MANLEY Absolute Headphone Amplifier
MANLEY started as the Lexus to Toyota's VTL (Vacuum Tube Logic) Toyota in the late 1980s. At first, MANLEY began along with David Manley's extraordinary air signature line of VTL devices, which generated ever invented tube preamps. A few years later, David and EveAnna Manley started the MANLEY brand as an independent company, and sooner, the Manley brand products shooted up and started to generate a lot of income. Manley Labs had always produced true audiophile roots and delivered their best in all its tube preamps productions.
According to the manufacturer, the MANLEY Absolute Headphone Amplifier has fifteen separate operating controls that are each meticulously constructed for simple adjustment and auditory diversity. The input signals are received via two selected stereo RCA jack pairs of their own invention, which are Teflon® insulated and gold plated. The front thumbwheel controls the volume or the supplied RF remote control, which uses a precision stepped relay ladder matrix attenuator in half-dB steps and has a Mute switch next to it. Baxandall Bass and Treble equalizers are vertically located right in front of the tubes, and a Balance Control with a signal swing of up to 144 dB may be entirely bypassed through a separate button. There is an EQ bypass switch added to it, and there are different buttons provided for mono, source, and output.
When in STANDBY mode, you may also select Bypass Thru Mode, which transmits RCA Input 1 straight to the RCA Outputs. There is a user-adjustable Headphone Overload Protection System. The ability to swap on-the-fly between all-triode Push-Pull and Single-Ended topologies is the first of the two most fascinating and distinctive characteristics. In essence, in Push-Pull mode, harmonic distortion is reduced, power output is increased, and noise floor should be reduced, but Single-Ended entirely changes the harmonic structure from odd-order to even-order, which is more melodic. There are three color options in The Manley Absolute Headphone Amplifier: They are Black, Silver, and Copper.
The Manley Absolute Headphone Amplifier has three panels: the Rear Panel, Front Panel, and Top Panel.
Rear Panel
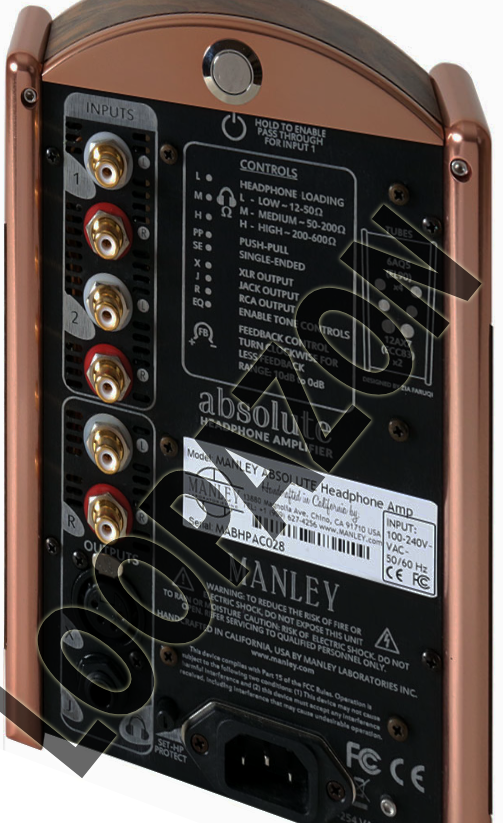
Power Button - There are two ways in which the power buttons work. One is Powering up the amplifier, and another is powering down. When connected to the main supply, the red LED illuminates, which indicates that it is STANDBY. As soon as the power button is pressed, the red LED will turn to white. From this, we come to know that the amplifier is warming up.
RCA Input 1 - Line-level analog sources such as a DAC or media player's analog outputs will be accepted through the stereo input using a pair of RCA jacks (L = white, R = red). This input is chosen by pressing the IN button on the control panel and choosing 1. When the unit is shut off, and BYPASS is enabled, this input will be routed to the RCA output.
RCA Input 2 - Line level analog inputs will be accepted by a stereo line-level input on a pair of RCA jacks (L = white, R = red). The IN button on the control panel is used to choose this input. RCA Out (R) - The Absolute Headphone Amplifier may be used as a preamplifier with this set of outputs. You have to run a pair of RCA interconnects to the power amplifier. This output is chosen by pressing the R key on the control panel's OUT button. When BYPASS is turned on, anything is plugged into input 1 on the headphone amplifier will be output here as well.
XLR Out (X) - This 4 pin XLR connects to a balanced pair of headphones should be connected to XLR Out. You have to utilize this output to get the best results. Choose X and press the OUT button to get the chosen output.
Jack Out (J) - Using a 1/4 inch jack plug, the TRS connector should be connected to the headphones. This output is chosen by pressing the OUT button on the control panel and choosing J. Headphone Protection Control - When it is positioned in a counterclockwise direction, then the Headphone Protection Control will be out of the circuit and will be passive. It checks the level of the output. Everything depends on the setting of the control. Further, the volume gets decreased on reaching this threshold.
FRONT PANEL
Power Indicator - There are two ways in which the power buttons works. One is Powering up the amplifier, and another is powering down. When connected to the main supply, the red LED illuminates, which indicates that it is STANDBY. As soon as the power button is pressed, the red LED will turn to white. From this, we can come to a conclusion that the amplifier is warming up.
Volume Control Thumbwheel - The thumbwheel in the front is used to control the volume. The volume is increased by turning it to the right and decreased by turning it to the left. We can hear the Audible mechanical clicking when you use the volume control.
Volume Level- It indicates the level of the volume. It has sixteen LEDs, with 127x 0.5 dB steps.
Mute Control - Sound is not allowed to travel through the output of the Absolute Headphone Amplifier. This control will mute the sound.
Select- This control modifies the architecture of the amplifier. The amplifier may be switched between push-pull and parallel single-ended operation. The signal is amplified in single-ended mode by connecting the two output tubes in series or parallel, making the pair act as a single tube.
TOP PANEL
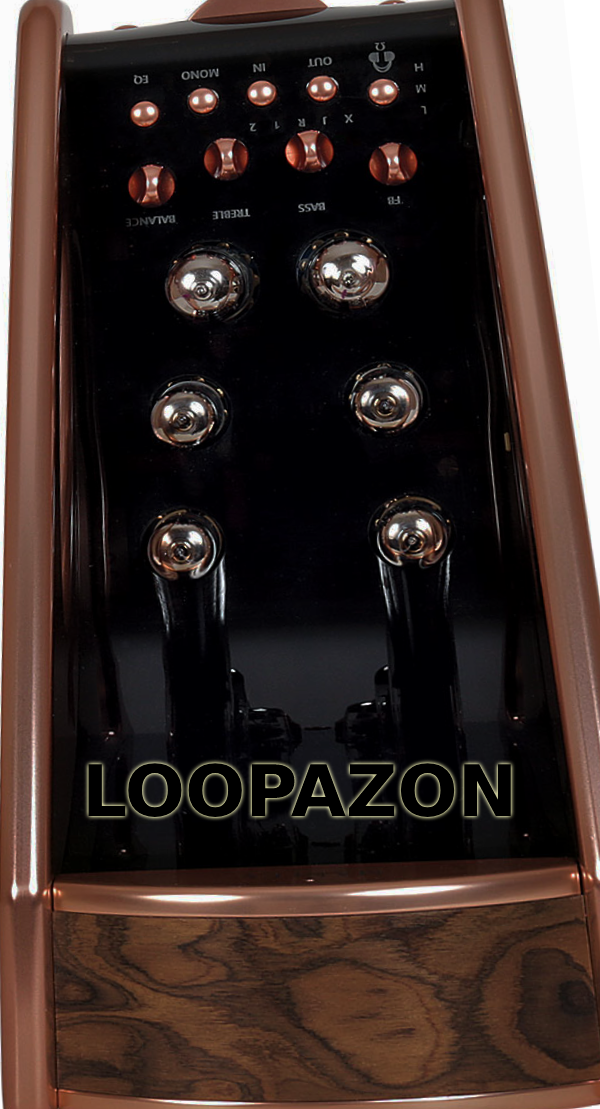
Input Control - This option is used to choose the intended line-level input. Two stereo inputs labeled 1 & 2 are accessible on the Absolute Headphone Amplifier. Press and hold this button until the White LED shows up.
Output Control - The Output control has Three outputs, namely X, J, and R. X means XLR and has a four-pin XLR connection. J means Jack refers to the standard 1/4-inch jack connector. R means RCA, which is a pair of RCA connectors that connect to a power amplifier.
Headphone Load Set - The Three load settings are as follows: L=Low (12-50 Ohms), M=Medium (50-200 Ohms), and H=High 200 to 600 Ohms). To pick the desired load (L, M, or H), press and hold the headphone load set button until the white LED matches your option. When you are hearing songs, push this setting.
Feedback Control - The quantity of global negative feedback provided to the amplifier is controlled by this knob. In most amplifier designs, feedback is employed to stabilize the output and decrease distortion. A part of the output is applied back to the input. The feedback is reduced by turning the control clockwise.
EQ Control - The tone controls will be activated as a result of this. The EQ LED glows when you press the button, indicating that the tone controls are now operational.
Bass Control - You should turn the control clockwise to increase the bass, and when you turn it counterclockwise, it will decrease the bass. At the midway position. The EQ is not applicable.
Treble Control - You should turn the control clockwise to increase the treble, and when you turn it counterclockwise, it will decrease the treble. At the midway position, the EQ is not applicable
Balance Control-You can control the balance between channels.
Mono Control - Combines the left and proper channels. When you listen to mono LPs using a mono cartridge, this will anchor the centre picture. When the button is pressed, the LED lights up. This is in mono mode.
Bypass Indicator - When you hold the power button, the bypass indicator gets activated. After this, the amplifier will automatically go off, and whatever input, if fed, will divert to the RCA output socket.