
Getting Started with Magix Music Maker | Music Production Software for Beginners
Form a band online, promote your music, buy custom beats, sound parts, and share your Beat or Track as a Royalty Free loop with us. Collaborate to make beats online with the best loop makers from around the world on the Forum for musicians and beat makers. Keep up to date with Music News and learn from FL Studio Video Tutorials and the articles on the Blog. Free DAW Music Software downloads, VST and Instrument Packs for FL Studio, Pro Tools, Logic, Ableton, and how to use the most popular free DAW Software, Fruity Loop Plugins, MIDIs and more.
Magix Music Maker is one of the most popular DAWs that exist today, that has maintained a consistent user-base of more than 2 million for the past few years. It is one of the earliest DAWs in the world having debuted in 1994. Twenty six years after its debut, the target user remains the same; the beginner. Just like some of the modern smartphone applications that allow users with absolutely no music training to produce music, Music Maker has allowed anybody with an interest in music to start producing their own little compositions on their Windows computers since its early days. It has never been a professional DAW, and was never intended to be one. In fact, the Music Maker was based on Samplitude, the full-fledged professional DAW from Magix.
Read: A Brief Introduction to DAWs
Music Maker was intended to be a miniature consumer version of Samplitude, just like how GarageBand was designed to be a scaled down consumer variant of Apple’s Logic Pro. However it isn’t anywhere as comprehensive or intricate as GarageBand. It is just good enough to get a complete novice started with music production. It is precisely an amateur’s possession, more inclined towards preset-based music creation. The best way a novice can get started is to be creative with the existing presets, trying to make unique combinations, layering them, adding effects and mixing them. Music Maker is the perfect choice for a Windows user as it easily facilitates all of these. It comes with a large collection of presets and samples besides allowing you to purchase additional ones from Magix itself at favorable prices. Magix offers the latest version of Music Maker in three editions; Magix Music Maker Free, Magix Music Maker Plus and Magix Music Maker Premium.
Read: Getting Started with GarageBand
Let us take an introductory tour of the latest version of Magix Music Maker:
This interface of the latest version of Music Maker looks familiar to those who have worked on other DAWs.
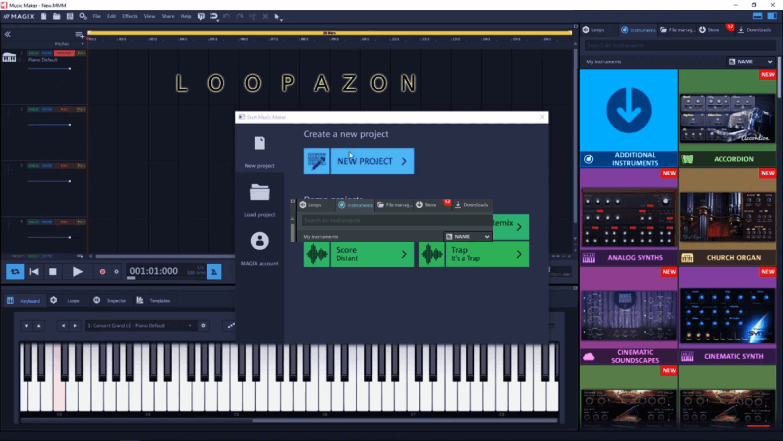
For newbies too, this looks interesting as it has a keyboard loaded at the bottom, when you enter the interface unlike most of its alternatives.
If you are intending to give audio and MIDI inputs in your Music Maker session, then you should ensure that the input settings are appropriate. To do this, click on the Program Settings icon adjacent to the File Menu.
In the Program Settings Window, select the Audio/MIDI tab. On the left side you have your Audio settings, and on the right you have your MIDI settings. On the Audio settings section, go to DRIVER SELECTION and select ASIO driver and choose from the list of audio interfaces. On the MIDI section, go to INPUT DEVICE and choose from the list of MIDI input devices.

As a beginner, you needn’t bother about the other settings in this Window now. Once you have ensured that the right Audio and MIDI input devices have been assigned, click OK to get started.

The right hand-side of the interface contains a panel that has the instrument tab active by default. This tab holds all the virtual instruments that come with Music Maker. You select from these instruments while recording MIDI tracks. The tab towards its left contains all the built-in loops that come with Music Maker. This large collection of loops is where most of the beginners would love to spend their first few weeks with Music Maker. You may drag and drop these loop presets to your timeline and create audio tracks straightaway. The panel also holds your file manager and download tabs.
Instead of starting off the traditional way by trying to toy with the built-in loops in Music Maker, let us straightaway start recording an instrument. To do this, go to the appropriate track on the timeline that you want your instrument to be recorded to, and click on the RECORD button on the track controls, to arm your track for recording.

An important thing to be noted here is that, unlike most other DAWs, you don’t have to load an Audio track or a MIDI track to the timeline. An empty track loaded on to your Music Maker timeline is not an Audio track or MIDI track until the user decides to provide input. So once you click the record button, it will either say MIDI RECORDING or AUDIO RECORDING. Click again to switch your track type. Let us try recording with guitar, since it allows us to work with effects and plugins in Music Maker. As we are not using a MIDI instrument here, we need to make sure that the record button reads “AUDIO RECORDING”.
As Loopazon recommends in articles about every DAW, do turn your CLICK TRACK on before you record, so that it allows you to nail your tempo in fewer takes. Click on the METRONOME symbol at the bottom of your timeline to enable CLICK TRACK.
![]()
Make sure that you do not forget to set the tempo of your input. Click on the BPM symbol adjacent to the metronome symbol to set your tempo in Beats Per Minute (BPM). Click on the RECORD button once you are ready, and provide your input. Your audio input will be recorded to your timeline.
Now that you have your guitar track recorded to your timeline, let us try to add effects. You may already be aware that most of the guitar tracks recorded to DAWs have their tones augmented using software amplifiers that are either part of the DAW package or paid third-party plug-ins. Let us try applying an amp to our guitar track. Do click on the FX buttonin the track controls
From the various options, click on Audio FX Rack track and choose Vandal SE, which is a free guitar amp simulator that comes along even with the Magix Music Maker Free.
From the drop-down list on the top, select the desired tone for your guitar.

Although you wouldn’t be auditioning the plug-in, you may come back and change the tone anytime.
Now let us record a MIDI track. Click on the RECORD button in the track controls of the track where you want to record your MIDI instrument to. Make sure that you have enabled the MIDI recording and not the audio recording. On the right-hand side of the interface, you will find all the free virtual instruments that come along with Music Maker.
Click the desired instrument and drag it straightaway on to your track. This will create a MIDI clip which you may edit or delete it to record a fresh track with the assigned virtual instrument. Once you record the track, you may double-click on the track to load the piano roll.

Here you can edit the notes, change their placement and quantize them. You record multiple layers of Audio and MIDI tracks, experiment with the large collection of built-in loops and make the best of your first session on Music Maker, as by now you would have certainly discovered how easily you can do a basic level of music production on the application.
Exporting your audio file is almost as simple as saving any file on your regular Windows applications. Go to the File Menu, select EXPORT and choose your desired audio format from the sub-menu.

Save the file to your desired destination folder.