
How to Make a Loop With FL Studio
Form a band online, promote your music, buy custom beats, sound parts, and share your Beat or Track as a Royalty Free loop with us. Collaborate to make beats online with the best loop makers from around the world on the Forum for musicians and beat makers. Keep up to date with Music News and learn from FL Studio Video Tutorials and the articles on the Blog. Free DAW Music Software downloads, VST and Instrument Packs for FL Studio, Pro Tools, Logic, Ableton, and how to use the most popular free DAW Software, Fruity Loop Plugins, MIDIs and more.
This tutorial will show you the quickest way to start making sample-based beats in FL Studio.
You’ll also learn principles that apply to any other DAW or sampling software.
Where to find samples
Step one is to find songs or sounds you want to sample.
A great place to start is online.
There are plenty of online resources to find songs and loops to download for free.
But be careful if you plan to make beats for profit. Most of the sounds you find are prohibited by the copyright police.
So be cautious. Try searching for royalty free samples, loops and sound libraries.
Royalty free samples allow you to use the content without copyright infringement.
Sample libraries also contain higher quality audio files in wav format, occasionally labelled with tempo and key.
If you’re just practicing and have no intention of sharing your music, then sample whatever you want!
But if you’re looking to practice safe sampling, start with licensed sound libraries, sample packs and drum kits.
Once you’ve downloaded audio files you want to sample, it’s time to create a new FL Studio project.
How to import samples into FL Studio
Step two is to extract the section you want to sample.
To do this, we’ll use Edison to import the audio file.
Open Edison by clicking on its icon in the menu.
Next, import the audio file you downloaded in the previous step.
With the full audio file loaded into Edison, it’s time to start sampling.
Use Edison to play the audio file until you find a section of the song you want to sample.
Ideally, you want to find at least 4 bars of music that loop seamlessly.
Once you’ve found a loop, you can drag along the waveform to highlight it.
After you’ve highlighted the loop, you can send it to the Playlist.
How to find the tempo of a sample in FL Studio
Once the sample is in the Playlist, you’ll want to find its tempo.
Finding the tempo is essential. It helps you align the BPM of your project with your sample. This ensures that the elements in your beat are in rhythm.
The best way to find the tempo requires some practice.
Start by aligning the sample with the start of the song in the Playlist. Then change your project tempo settings until the loop matches the bars of the grid.
This confirms that your project tempo is in sync with your sample.
Another way to find the BPM of your sample is to use FL Studio’s tempo detection feature.
Just right click the waveform icon in the top left corner of the audio file, and click on Detect tempo.

In the new dialog window that pops up, click the option with the widest range.
Then, the software will provide an estimated tempo of the sample.
But sometimes the result is wrong. Your best bet is to learn how to count beats using the first method.
How to find the key of a sample in Fl Studio
After you’ve found the tempo, you may want to find the key.
This step requires some basic music theory, and is entirely optional.
To manually find the key of your sample, open a new instance of a simple instrument plugin, like FL Keys, in the channel rack.
Then listen to the loop, and play the notes on your piano roll that make up the chords of the music.
If you’re unsure what key makes up the notes, refer to a reference chart.
Now that you have the tempo (and key), you have a couple options:
Option #1 is to use the loop as the foundation of your beat.
Option #2 is to chop the loop to create a new pattern.
Let’s discuss both…
How to loop samples in FL Studio
If you’re satisfied with the loop as it stands, you can repeat it throughout your track.
To loop your samples, use the Paint tool to add new instances of the loop in the Playlist, as many times as you want.
Quick tip:
If you plan to customize the loops, you’ll want to make each sample unique.
Otherwise, you’ll end up changing ALL the loops in your track.
How to chop samples in FL Studio
If you prefer to chop your loops, you’ll want to use a sampler instrument.
Using a sampler, you can split your loops into sections and arrange them into new patterns.
For this tutorial, we’re going to use Fruity Slicer.
Other tools, like Slicex and various third party samplers, offer more advanced customization. But that’s beyond the scope of this tutorial.
So what’s the difference between Fruity Slicer and Slicex, you ask?
Here’s a simple answer:
Slicex is a sampler instrument AND an audio editor. This makes it great for customizing each slice and sampling drum loops.
Fruity Slicer is just a sampler instrument, and is simpler to use.
So for now, let’s return to Fruity Slicer to keep things simple…
First, open a new instance of Fruity Slicer in your sequencer.
Next, load the sample by clicking on the sample button, and choosing “load sample”. Navigate to the audio file you want to import.

Once you load the sample, change the tempo of Fruity Slicer to the tempo of the sample.
Now it’s time to chop the sample.
Click the slicing button and choose from the incremental options.
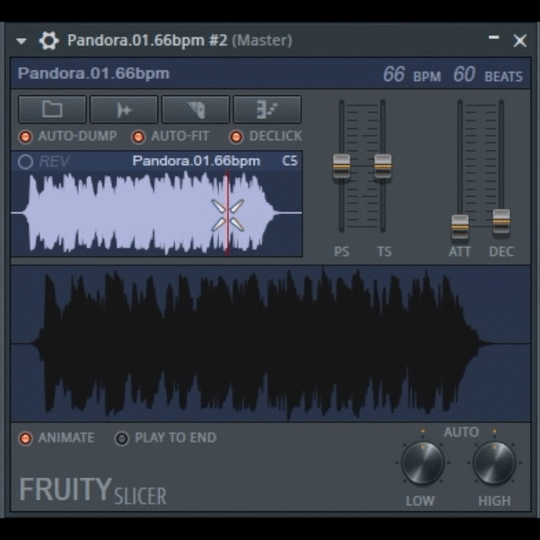
I recommend you choose “Beat” as your slicing option for the best results.
You can choose to slice by fractions if you prefer, but using more slices will add complexity later.
At this stage, you should have your samples loaded and key mapped to your midi keyboard (if you’re using one).
Now you can use Fruity Slicer like any other virtual instrument to make your own patterns.
Draw the notes into your piano roll to find a pattern that fits your beat.
Or play the samples on your midi keyboard while recording into FL Studio.
Experiment with your samples to put your beat together.
Since sampling is the focus of this tutorial, we’re going to skip the part where you add to your beat.
This is where you would enhance your arrangement with bass, drums, one-shot vocal samples, sound FX, etc.
So let’s move on to step 3 for some tips on improving your sample-based beats.
Tips for improving your samples
After you’ve set the foundation for your arrangement, you can customize your samples in the mixer.
Tip #1: Make room for the low end
Oftentimes your samples will include elements that detract from the overall mix.
This can lead to tracks that sound busy.
Your best bet is to use EQ to remove unnecessary elements.
But be careful when removing frequencies. Dynamic range is essential in music.

Tip #2: Customize the character of your samples
You might want to add mixing effects to change the feel of the sample.
For example, you can apply reverb, echo or time stretching effects to alter the sample.
There are also plenty of advanced techniques to help you create unique versions of your samples, which we’ll explore later.
Tip #3: Create your own mixing presets.
Once you’ve experimented with enough plugins, you’ll find particular settings that you like.
Be sure to save your favorite configurations as presets.
As you work, create new mixing channels for your samples, and save your configurations.
Congrats on making it this far!
Have fun sampling, and hit us up if you have any questions.