
How to Use Loopazon to Make Beats and AI Music | Loopazon
Form a band online, promote your music, buy custom beats, sound parts, and share your Beat or Track as a Royalty Free loop with us. Collaborate to make beats online with the best loop makers from around the world on the Forum for musicians and beat makers. Keep up to date with Music News and learn from FL Studio Video Tutorials and the articles on the Blog. Free DAW Music Software downloads, VST and Instrument Packs for FL Studio, Pro Tools, Logic, Ableton, and how to use the most popular free DAW Software, Fruity Loop Plugins, MIDIs and more.
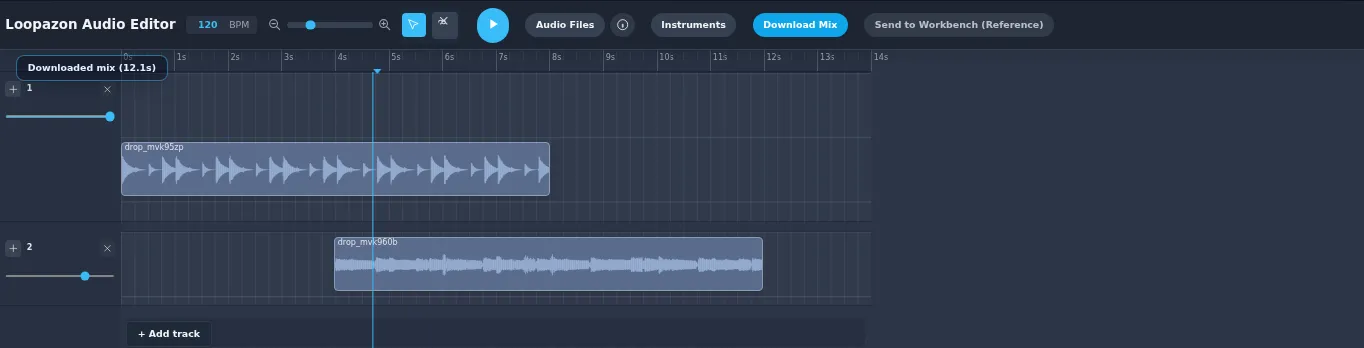
A beat often begins with one sound you want to hear again: a drum groove, a warm chord, a bassline, or a melody you have been humming all day. Loopazon gives you several ways to develop that first idea. You can choose sounds from its free loop library, use the AI Workbench to explore combinations, and arrange your favourite parts in the browser-based audio editor.
This guide takes you from finding your first loop to downloading a beat. You will also build a simple practice mix with three matching sounds, then learn how to turn a repeating idea into an arrangement.
Try this first: open Free Loops, preview a sound, and choose Send to AI. When the Workbench finishes building the idea, press Play All. Keep the parts you like, then use Send To Editor to start arranging.
Find your way around Loopazon
Three areas do most of the work. Free Loops is where you discover individual sounds. The AI Audio Editor page brings together the Workbench, where you develop a musical idea, and the timeline editor, where you decide how it unfolds. AI Generations lets you explore saved community mixes for another starting point.
Start with headphones, a browser, and a little room to experiment. A laptop or desktop gives you more space for the timeline. You only need microphone access when you want to record through Hum.
If you already produce in a digital audio workstation, or DAW, you can download WAV files and continue there. Follow our step-by-step guide to making a beat with free loops in FL Studio for a worked example. If you are new to production, you can complete the practice beat below in Loopazon itself.
1. Choose loops that work together
Open the catalogue and listen before downloading. Use the Categories filter to narrow your search to the kind of sound you need, such as drums, bass, piano, or guitar. Use Genres to explore a musical style.
Two details help when combining sounds: BPM is the tempo, measured in beats per minute, and Key describes the musical home of a pitched part. For a first beat, choose loops with the same BPM and try bass, chords, and melody in the same key. Matching labels gives you a useful starting point; listen to check that the rhythms and notes actually fit.
Build a small collection with clear jobs: drums provide the pulse, bass supports the low end, chords set the mood, and a melody gives the listener something to remember. You can make a strong first beat with just three of those layers.

Preview a loop and check its musical details before deciding whether to download it, develop it with AI, or arrange it yourself.
| Button | What happens | When to use it |
|---|---|---|
| Download WAV | Saves the loop as an audio file. | You want a local copy or plan to work in a DAW. |
| Send to AI | Uses the chosen loop as the starting point for a Workbench arrangement. | You want help finding musical parts around a sound. |
| Send to Editor on a loop card | Adds that individual loop to the editor's Audio Files. | You want to drag it onto a track and arrange it yourself. |
2. Make your first beat with three matching sounds
For a straightforward exercise, use the Loopazon Starter 120 pack on the Free Loops page. Download Pocket drums, Round bass, and Warm chords. Each source loop lasts four bars, or eight seconds, at 120 BPM in 4/4 time. The bass and chords are in A minor.
- Open the editor. Go to the AI Audio Editor, set the timeline editor to 120 BPM, and open its Audio Files panel. Set the tempo before importing these loops.
- Import the sounds. Use Upload Audio to bring in the three WAVs, one at a time. This imports audio for arranging; it is separate from the Workbench's reference upload.
- Make three tracks. Drag the drum file onto an audio track. Use + Add track for the bass and chords, placing each on its own track.
- Line up the starts. Align the three clips at the beginning of the timeline.
- Balance by ear. Start each track around 40% volume, press Play, and adjust. Let the drums stay clear, bring in enough bass to support them, then raise the chords until the mood comes through.
- Keep a first version. Press Download Mix in the timeline editor to download your mix as a WAV.
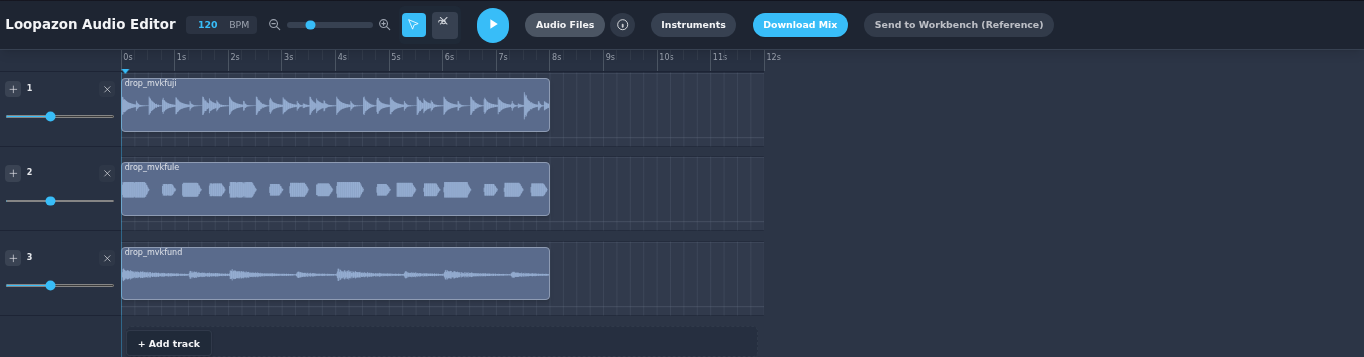
The starter exercise keeps drums, bass, and chords on separate tracks, so you can change their balance independently.
You can listen to the existing three-track editor example for a reference. These practice sounds are original synthesized loops. The AI workflow comes next.
3. Build an AI music idea around a loop
Find a loop you enjoy and click Send to AI. Alternatively, enter its number in the Workbench's Loop ID field and click Go. The selected sound guides the arrangement.
For a concrete starting point, try Digital Dreamscape – Hyper Arp, loop 15114. The editor page's before-and-after example lets you hear the original beside a real Workbench mix. Your own generation may take the sound in a different direction.
Once the parts are ready, click Play All. The Workbench organizes the idea into musical roles such as Groove, Melody, Harmony, and Low End. Listen for the relationship between them: does the bass support the drums, and can you still hear the phrase that attracted you to the original loop?
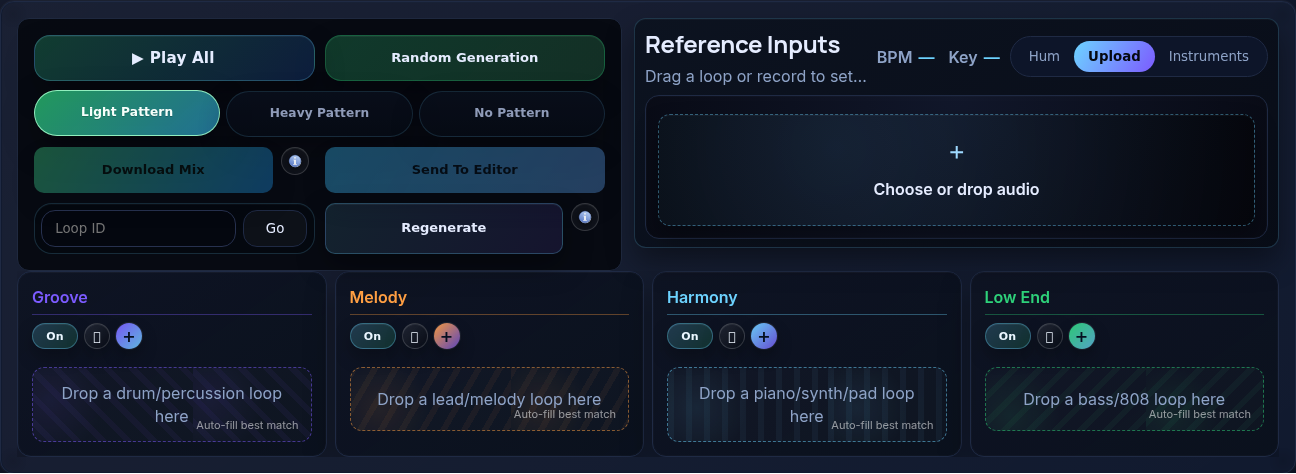
The Workbench is where you explore starting points and shape a repeating musical idea before arranging it on the timeline.
Keep what works. Lock a part you want to preserve, then choose Regenerate to find alternatives for the unlocked parts. Existing patterns stay in place. This lets you develop a promising idea one decision at a time.
4. Start with a hum, an instrument, or a surprise
A catalogue loop is only one starting point. Choose the route that fits the idea you already have.
Hum a melody or beatbox a rhythm
Choose Hum, click Start recording, and allow microphone access. Wait for the countdown, perform a short phrase, then press Stop. The Workbench begins building around the reference automatically.
Keep the recording simple: one clear tune or rhythm, performed at a steady pace. A short phrase is easier to judge than a long performance with several different ideas. The recording guides the result; treat it as inspiration for the arrangement rather than an exact transcription of every note.
For a complete example with reference audio, a real Workbench result, and export steps, follow our guide to turning humming into a beat with Loopazon AI.
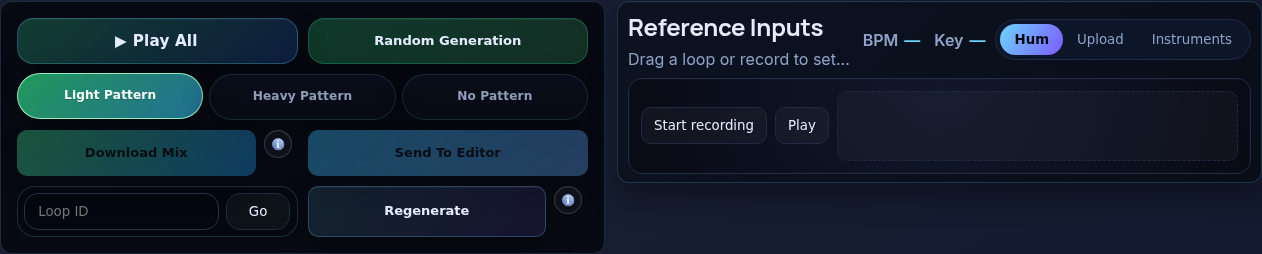
Choose Hum to record a short melody or rhythm as the starting reference.
Play the piano or pads
Choose Instruments, then Piano or Pads. Play with the mouse or the keyboard letters shown on screen. Piano voices include Grand Piano, Electric 80s, and Synth Lead. Scroll inside the Instruments panel if the keys or voice choices are out of view.
Click Record Reference, wait for the countdown, play your phrase, then click Stop. Your performance becomes the reference for a new generation. Try a few notes with a distinctive rhythm; you can decide on a more elaborate melody after hearing the backing parts.
Upload your own reference
Already have a recording? Choose the Workbench's Upload tab and use Choose or drop audio. Use this when you want a recording to guide the AI workflow. To arrange a file directly, import it through the timeline editor's Audio Files → Upload Audio instead.
Explore Random Generation or choose instruments
Click Random Generation to explore a fresh combination of Loopazon loops, then audition it with Play All. It is a useful starting point when you want to hear something before deciding on a direction.
For more control over the sound palette, open the homepage and select Selected instruments. Choose up to four instrument types and click Generate Selected Mix. The mix draws from those types; each choice is included when a compatible combination is available. Try a focused selection such as drums, bass, and piano.
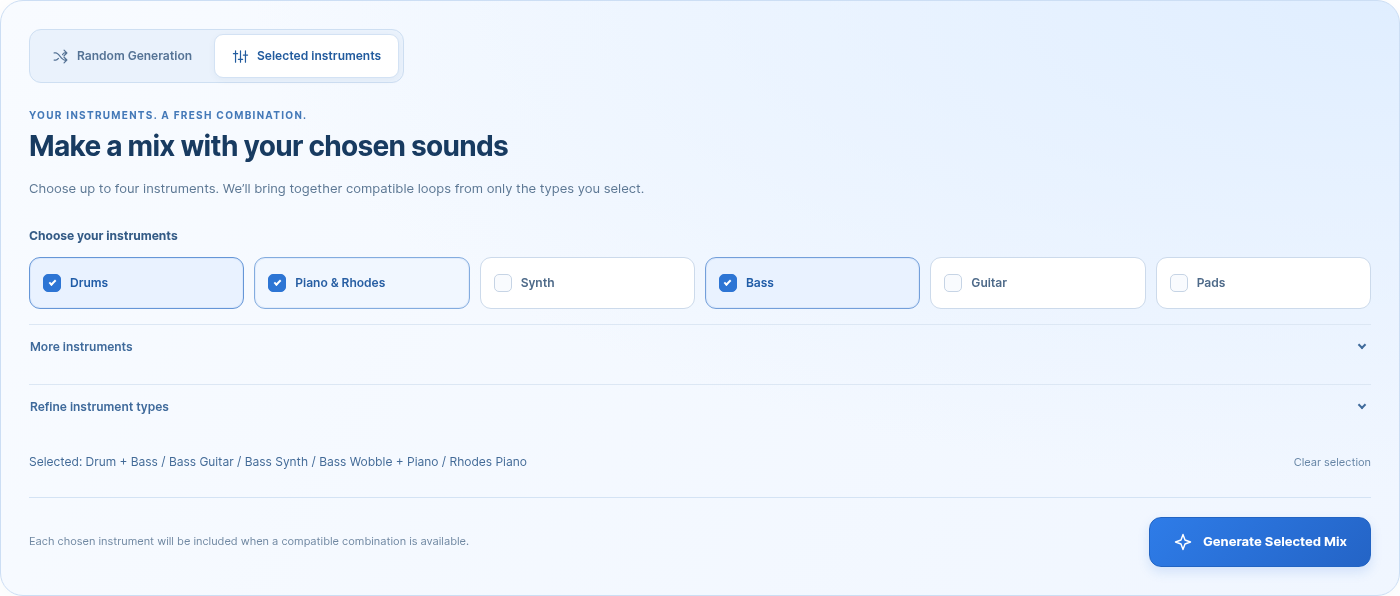
Selected instruments lets you set the palette before exploring a new mix.
5. Give the beat a groove
Good combinations need space. In the Workbench, compare No Pattern, Light Pattern, and Heavy Pattern. No Pattern lets the layers play continuously through the cycle. Light Pattern introduces a lighter rhythmic shape, while Heavy Pattern creates a more pronounced, chopped feel.
You can also click the pattern blocks to choose when parts enter and drop out. Try leaving the melody quiet for a moment, then bringing it back over the drums. Listen to the full cycle after each change; a part that sounds impressive alone may crowd the mix when everything plays.
Make the most memorable sound easy to hear. If the arrangement feels busy, lower a competing part or give it fewer entrances. If the bass overwhelms the drums, reduce its level before adding anything else.
6. Turn the repeating idea into an arrangement
When you like the Workbench mix, click Send To Editor. This transfers the current mix as one combined audio clip, placed on an editor track and in Audio Files. You can cut and repeat that clip. To arrange drums, bass, and melody independently, bring individual loops into the editor on separate tracks, as in the starter exercise.
Use Select to move clips along the timeline. Use the Slice scissors to split a clip, then switch back to Select to move the pieces. Click inside the timeline before using Ctrl+C / Ctrl+V on Windows or Linux, or Cmd+C / Cmd+V on Mac. Paste places copied clips at the playhead on their original channels.
For the three-track practice beat, try this 16-bar arrangement. At 120 BPM in 4/4, each four-bar section lasts eight seconds. Copy the original eight-second loops end to end and decide which tracks belong in each section.
| Section | Time | What to play |
|---|---|---|
| Bars 1–4 · Intro | 0–8 seconds | Warm chords alone, establishing the mood. |
| Bars 5–8 · Main groove | 8–16 seconds | Add Pocket drums and Round bass. |
| Bars 9–12 · Breakdown | 16–24 seconds | Remove the drums and leave room to breathe. |
| Bars 13–16 · Return | 24–32 seconds | Bring all three parts back together. |
This small change in energy gives the listener a beginning, contrast, and a return. Once it works, add a melody or extend a section. Use the source loops for precise repetition; the editor's exported mix can include a short output tail.
To add another instrument, create a fresh track with + Add track, then open its + menu. The same menu gives you Effects such as Filter, Delay, and Compressor. Add one effect, listen, and bypass it to compare before making another change.
7. Download the right version
The Workbench and timeline editor both have a Download Mix button, but they capture different stages of the process. The Workbench exports one pattern cycle as a WAV using the current track settings and pattern blocks. The timeline editor exports the arrangement you have built there as a WAV.
Play through the arrangement before exporting. Check that the first sound starts where you want it, that the transitions feel intentional, and that the ending has room to finish. Give the file a useful name such as midnight-chords-120bpm-v01.wav, and keep the original loops with it if you plan to continue in a DAW.
Keep exploring and share your own sounds
Visit AI Generations to preview saved mixes, narrow the selection with filters, download a WAV, or try Remix Again. The homepage's Popular and Recent AI Generations sections offer another way to find an idea worth developing.
The Articles, Software, and video tutorials in the site menu can help you build your production skills. When you have a sound of your own to contribute, use Upload free loop in the Loops menu, or Upload track in Tracks for a track submission. Give other producers accurate tempo, key, and descriptive details, and share only material you have the rights to upload.
Questions that come up on a first session
Do I need an account to download loops?
You can preview the catalogue and download up to 10 loops as a guest. After that allowance, create a free account or sign in to continue. See the Loopazon FAQ for the current download rules.
Can I use the loops in a released song?
The catalogue loop licence allows non-exclusive use in personal and commercial music projects. Credit the creator when the listing requests it. The practice pack has its own Starter 120 licence. Keep the relevant listing and licence with your project.
Will AI create a complete song with lyrics and vocals?
The workflows here help you create loops, beats, and instrumental arrangements. Develop those ideas into song sections, then add your own lyrics, vocals, and other performances as your track takes shape.
Why is there no sound?
Press the playback control for the area you are using: Play All in the Workbench or Play in the timeline editor. Check that the browser tab and your output device are unmuted and the track levels are raised. For Hum, also check the browser's microphone permission.
I sent a loop to the editor. Where did it go?
Look in Audio Files and drag the loop onto an audio track. Sending an individual catalogue loop to the editor adds it to that panel; transferring a Workbench mix also places the combined clip on a track.
Make one small beat you want to hear again. Choose a sound, give it a supporting rhythm, and create a change that makes its return feel good. Find your first loop or open the Workbench and begin with the idea you have today.