
How to Chop Samples and Make a Beat: A Free Loopazon Tutorial
Form a band online, promote your music, buy custom beats, sound parts, and share your Beat or Track as a Royalty Free loop with us. Collaborate to make beats online with the best loop makers from around the world on the Forum for musicians and beat makers. Keep up to date with Music News and learn from FL Studio Video Tutorials and the articles on the Blog. Free DAW Music Software downloads, VST and Instrument Packs for FL Studio, Pro Tools, Logic, Ableton, and how to use the most popular free DAW Software, Fruity Loop Plugins, MIDIs and more.
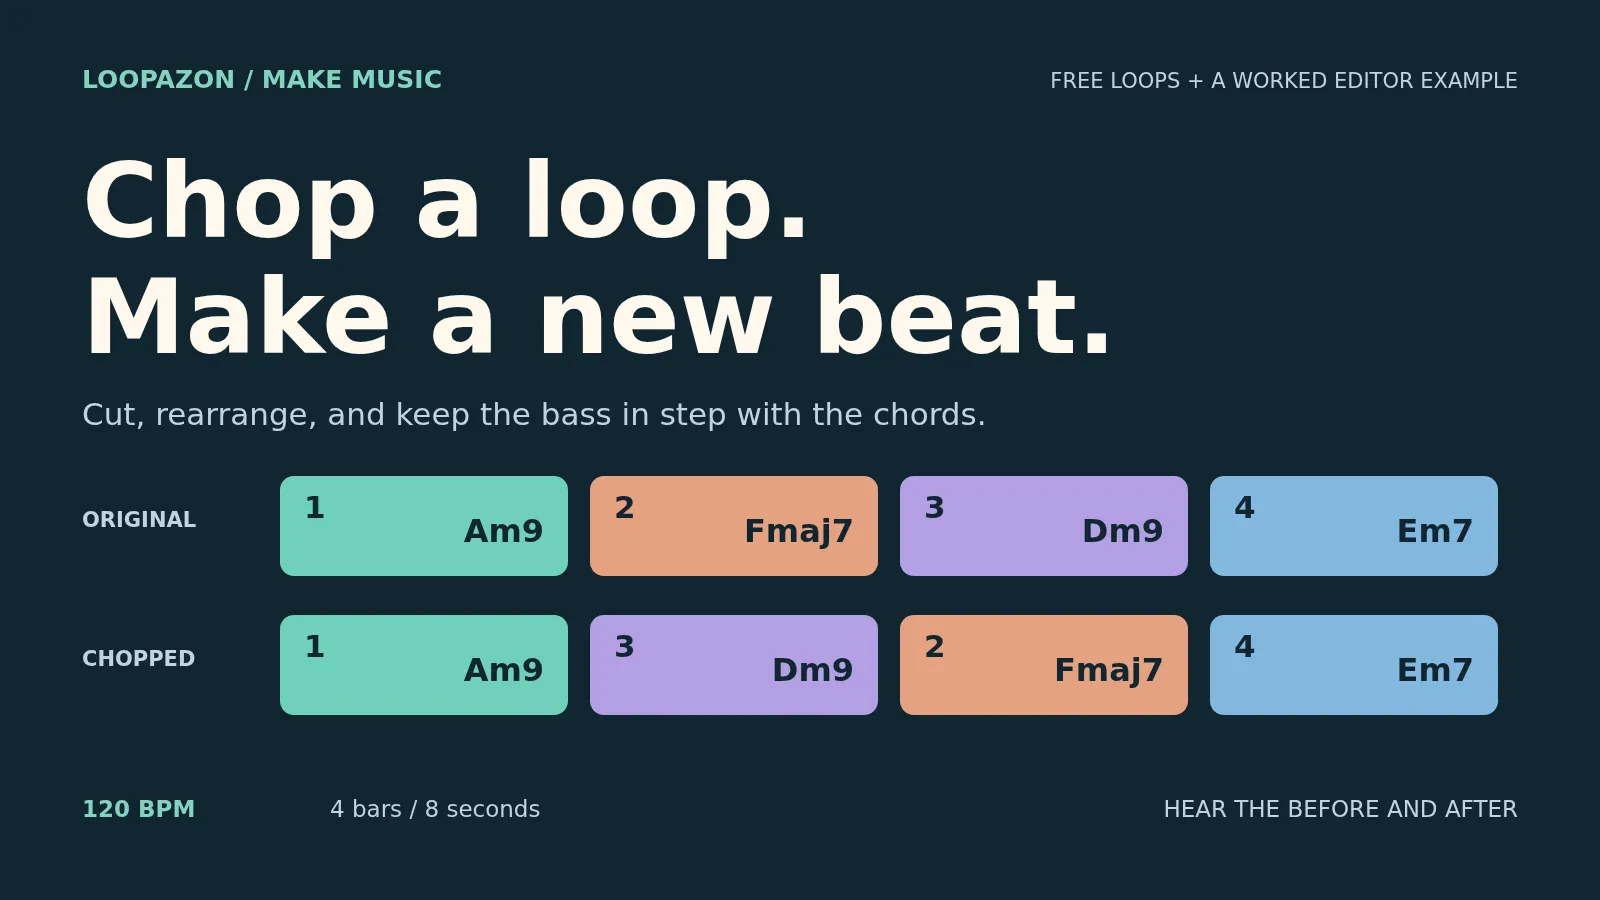
A loop does not have to keep its original shape. Cut it into smaller pieces, move those pieces, and the same sounds can suggest a different musical direction.
In this tutorial, you will chop a four-bar chord loop, rearrange its middle bars, and turn it into a beat with matching bass and drums. The sounds are free, the editing happens in Loopazon's browser editor, and you can hear the original and finished versions below.
Updated November 14, 2026. This guide uses the current Loopazon timeline editor.
Hear the difference before you start
1 · The original chord order
Download the original-order preview · WAV
2 · The same chords, chopped and reordered
Download the chopped-chord preview · WAV
3 · The chopped chords with matching bass and drums
Download the finished example · WAV · Example notes
The first two examples use the same chord sound and level. Listen for the change in the middle of the phrase. In the final version, the bass follows that new chord order while the drums keep their original groove.
These examples were edited and exported in the real Loopazon browser editor using original synthesized Starter 120 sounds. They demonstrate an eight-second musical phrase; editor exports can include a short tail. Use the unmodified source WAVs below to follow the exercise.
Download the three practice loops
All three sources are 120 BPM, four bars in 4/4, and exactly eight seconds long. Their WAV files are stereo, 48 kHz, 24-bit. The bass and chords were written for the same progression, making them a useful pair for learning how a sample edit affects the rest of a beat.
| Free source WAV | Role in the exercise |
|---|---|
| Warm chords | Cut into four one-bar pieces and rearrange. |
| Round bass | Make the same cuts and follow the new chord order. |
| Pocket drums | Keep the full eight-second loop intact. |
The files come from the Loopazon Starter 120 pack. Save them in one folder. For later experiments, browse free loops and samples and choose a phrase with a clear rhythm and enough space to hear your cuts.
What is sample chopping?
Sample chopping means dividing recorded audio into pieces that you can rearrange or play separately. A piece might contain a whole bar, a chord, one drum hit, or a short vocal sound. Cutting changes the boundaries; arranging changes what the listener hears next.
This exercise uses one-bar pieces so the harmonic change is easy to follow. Once that makes sense, smaller cuts can create repeats, pauses, and new rhythms.
Do you need a loop sampler?
A slicing sampler can map pieces to playable notes or pads. For example, FL Studio's Slicex makes slices playable from its Piano roll or a controller. Loopazon's workflow here uses audio clips on a timeline: you cut and move the waveforms to build the phrase. You do not need to perform the slices on a keyboard to complete this tutorial.
1. Import the chord loop and check its length
- Open the Loopazon Audio Editor and start with an empty timeline. Save any existing project first.
- Set the timeline editor to 120 BPM before importing the practice files, then leave that tempo unchanged.
- Open Audio Files → Upload Audio and choose the Warm chords WAV.
- Drag the file onto the first audio track at the beginning of the timeline.
- Check that the full clip runs from approximately 0 to 8 seconds. Play it once before editing.
Make sure you are importing into the timeline's Audio Files panel. The Workbench's reference Upload tab is a separate workflow for generating an arrangement around a sound.
The original chord cycle is Am9 → Fmaj7 → Dm9 → Em7. You do not need to know how to play those chords; for now, think of them as four different colours in the phrase.
2. Choose the cut points
At 120 BPM, each beat lasts half a second. Four beats make a two-second bar, so the three internal boundaries in our loop are 2, 4, and 6 seconds.
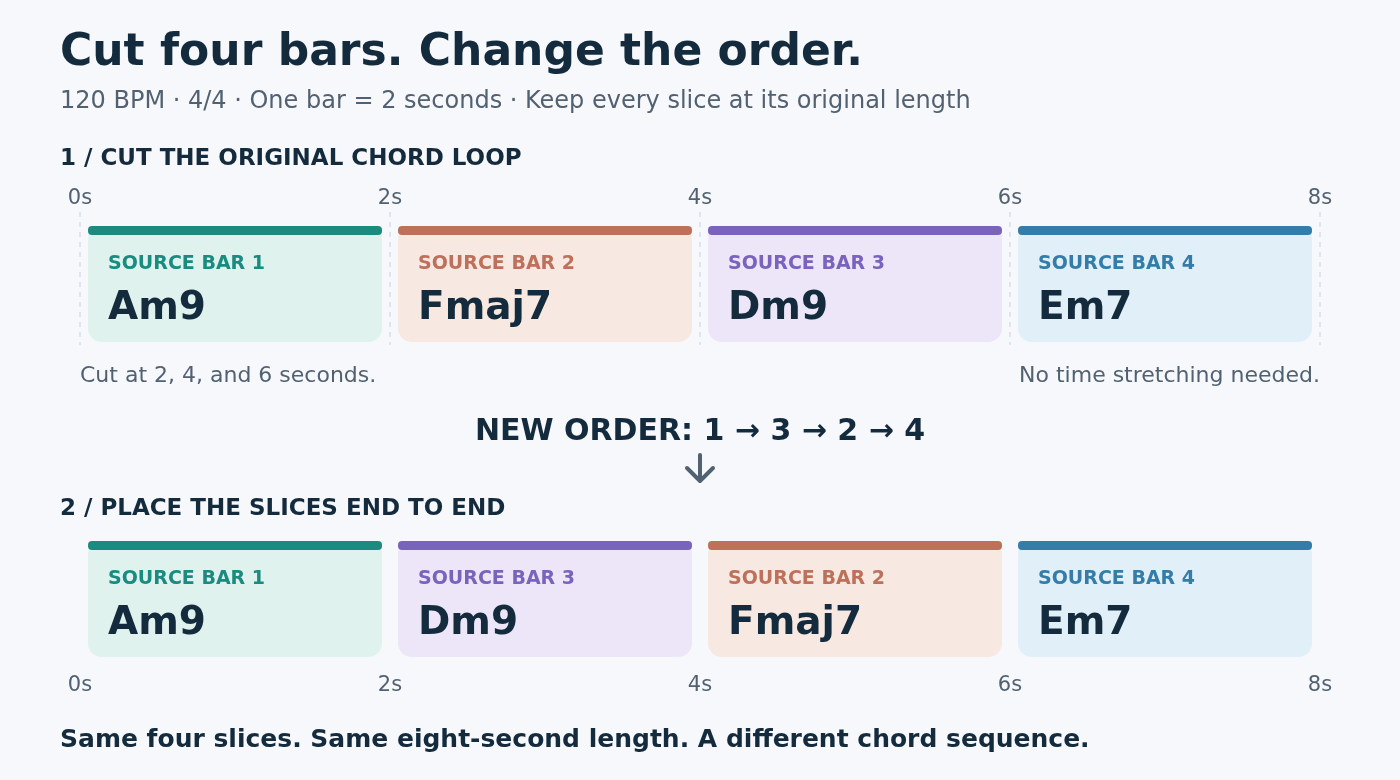
The plan: keep the first and last source bars, and swap the two middle bars. This is an arrangement diagram, not a screenshot of snapping controls.
For another loop, work out its real phrase length before cutting. A two-bar sample and a four-bar sample can share the same BPM. Do not assume that every file lasts eight seconds, or that a long reverb tail is another musical bar.
3. Slice the loop into four pieces
- Zoom in until the time ruler and waveform are easy to read.
- Choose Slice, the scissors tool.
- Click the chord waveform at approximately 2 seconds, then at 4 and 6 seconds. Aim for the bar boundaries shown in the diagram. You should now have four adjacent pieces.
- Switch back to Select before moving anything.
- Play across the joins. If a cut is misplaced, use Undo and make it again.
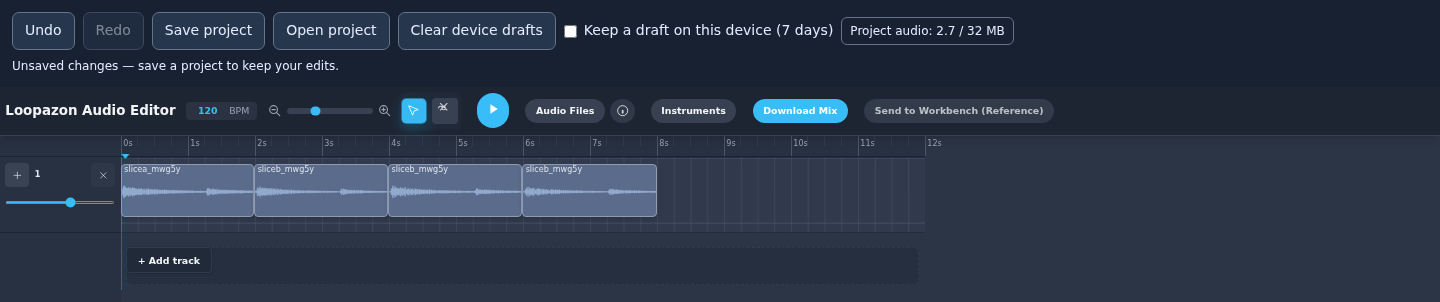
Use the ruler carefully. The current audio timeline does not automatically snap these cuts to musical bar boundaries. Zooming in helps you place them accurately. Listen as well as looking: a line on a waveform is not proof of a clean edit.
If you cut another sound in the middle of a sustained note, you may hear a click or an abruptly missing tail. Try a quieter point or a more suitable phrase boundary. For fine fades and crossfades, use an editor or DAW that provides those controls; this walkthrough does not rely on automatic click removal.
4. Rearrange the pieces into a new progression
Change the source-bar order from 1–2–3–4 to 1–3–2–4. The middle of the progression becomes Dm9 followed by Fmaj7.
- With Select active, move source bar 2 temporarily into empty space after the original phrase.
- Move source bar 3 into the second position, immediately after source bar 1.
- Move the parked source bar 2 into the third position.
- Keep source bar 4 at the end. Check that all four pieces meet without unintended gaps or overlaps.
The new order is Am9 → Dm9 → Fmaj7 → Em7. No new notes or pitch shifts are required for this first variation. You are changing the order of the source material.
Play the phrase several times, then compare it with the original-order audio above. Decide whether you prefer the new movement before adding more tracks. Sampling becomes more useful when each edit has a musical reason.
5. Make the bass follow the new chord order
Import Round bass through Audio Files and put it on a second track with + Add track. The original bass follows the roots A → F → D → E. If you leave it unchanged under the reordered chords, its middle bars no longer follow the same progression.
Cut the bass at the same 2-, 4-, and 6-second boundaries, then reorder its pieces 1–3–2–4 too. Its new root sequence is A → D → F → E.
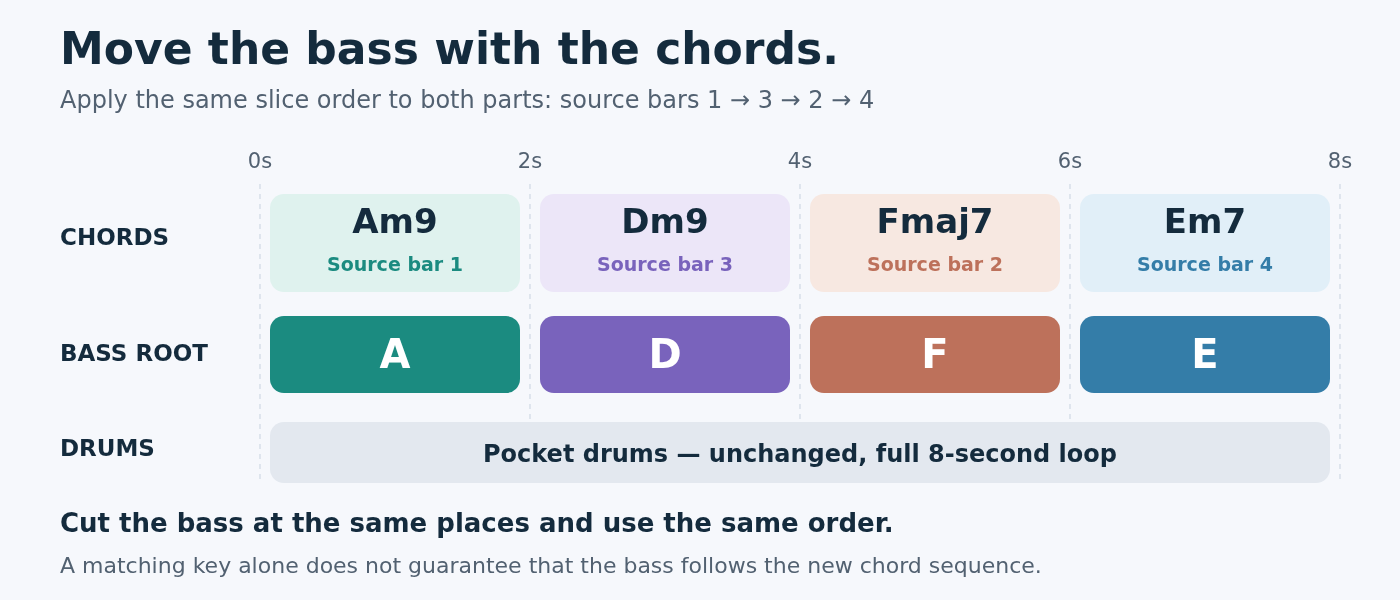
This is why a matching key label is only a starting filter. Two parts can both belong to A minor while following different chord movements. Check their phrase order and listen to the combination.
For this exercise, import Pocket drums onto a third track and leave its complete eight-second clip intact. Align its beginning with the chords and bass. The harmonic reordering does not require us to chop this drum groove.
6. Balance the beat and save your work
Our example uses these starting track levels: chords 60%, bass 50%, and drums 70%. They are settings for these particular source files, not a rule for every mix. Adjust them until the chord movement is clear and the bass supports the rhythm.
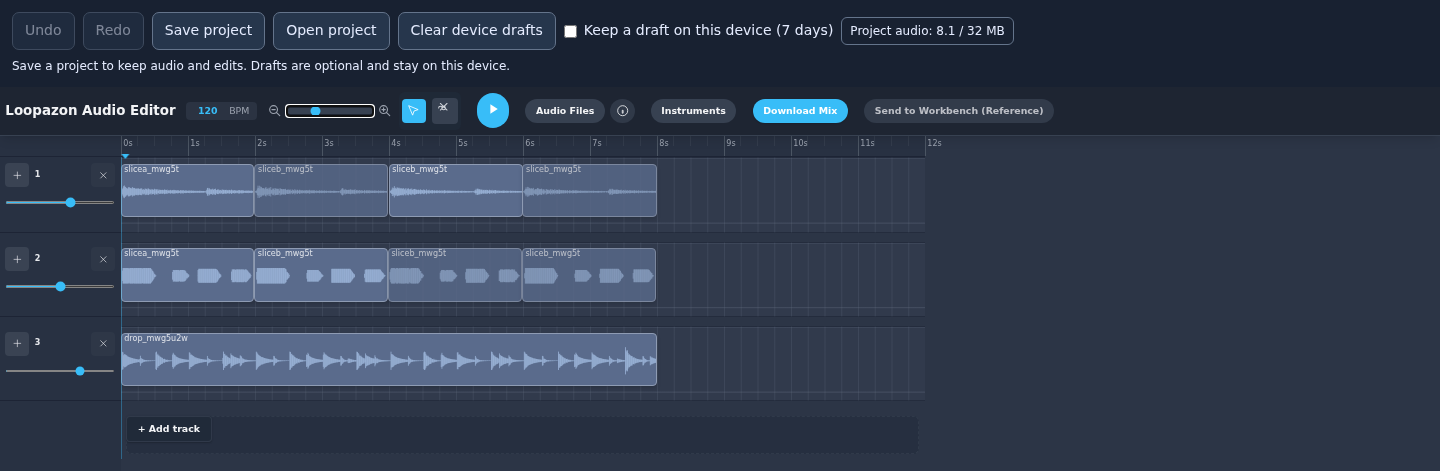
Top to bottom: reordered chords, matching bass, and the unchanged drum loop. This is the saved project reopened in the editor.
Check the joins at the middle bars and listen to the ending. If the full mix distorts, lower the contributing track levels. Add effects only after the arrangement and balance work without them.
- Click Save project to download an editable .loopazon file.
- Keep it for use with Open project, along with your source WAVs.
- Click the timeline editor's Download Mix to export a WAV.
- Listen to the downloaded file before sharing it or building a longer arrangement.
An audio export keeps the sound; the project keeps the separate clips and edits. Save both if you want to come back and try another order.
Try a second variation
Once the bar swap works, save a second project and change one detail. Repeat the first bar, leave a short pause before the last chord, or divide the final bar into smaller pieces. If you change the harmonic order again, check the bass again too.
You can also select clips, copy with Ctrl+C on Windows/Linux or Cmd+C on Mac, then paste with Ctrl+V / Cmd+V at the playhead. Click inside the timeline first. Paste uses the original channels, so inspect the placement before continuing.
To develop a longer track, keep one version sparse and bring the full beat into another section. Our FL Studio loop tutorial includes a 32-bar arrangement plan. The drum-and-shaker guide shows how changing rhythmic layers can create movement without changing the melody.
Quick answers about chopping samples
Do I need to change the pitch?
No. This exercise only changes the order of existing bars. Pitch shifting is a separate creative choice. Get the cuts and arrangement working first so you can hear what each later change does.
Why does the chopped sample click?
The cut may interrupt a waveform or tail abruptly, or adjacent clips may overlap. Inspect the join, move the boundary to a quieter point where appropriate, and listen again. Use dedicated fade or crossfade tools in a DAW when the material needs finer treatment.
Can I use these practice sounds in a released track?
The Starter 120 licence permits non-exclusive use in personal and commercial finished projects, without required credit. It does not permit resale or redistribution of the standalone sample library. For other downloads, read the source terms and Loopazon's catalogue licence, including any requested creator credit.
Can I start with an AI Workbench result?
Yes: export its mix as a WAV, then import that file into an empty timeline session for slicing. Remember that a combined mix contains its parts together; cutting it moves everything inside that clip. Keep individual source loops when you want separate control. The illustrated Loopazon guide explains the two workflows.
Start with four clear pieces, make one deliberate change, and listen to what that change does to the whole beat. More cuts give you more options; a useful arrangement comes from choosing which ones to keep.